Two very good articles on the nature of Biblical eldership
http://whatsbestnext.com/2014/10/the-true-nature-of-elder-authority-in-the-church/
http://whatsbestnext.com/2014/10/getting-accountability-right/
Thursday, November 20, 2014

Wednesday, October 22, 2014
Whatever you've heard about me, it's not the whole truth - I am worse.
I've heard some things about me from various sources recently and I didn't like them. But whatever you've heard, it's not the worst.
This quote from Spurgeon sums up how to think about the charges against me:
Depravity - The Bible makes my wickedness very clear. Genesis 6:5 says "every inclination of the thoughts of the human heart was only evil all the time". I was born with a desperately wicked heart (Psalm 51:5). I have no merit of my own. Any charge you can find to bring against me, there is worse available. Much worse.
Propitiation - my favourite word (a life saver). When God calls me to Himself with a repentant heart, in simple faith, the eternal wrath of a Holy God has been removed, He has absolutely no record of anything ever having gone wrong in my life, and I am restored to relationship with Him, and treated as a son, irreversibly, and for ever (Titus 3:7).
 Praise the God of restoration, praise the God who gives, and takes away. Let me always walk through life "sorrowful, yet always rejoicing" (2 Cor 6:10). I will always have sorrows, that is a fact of life, and yet in Christ I always have much more cause for rejoicing. Praise God that through these tough times he drives me closer into fellowship with other believers, and closer to the foot of his Throne in humble dependence on Him, and Him alone.
Praise Him that he continues to work through broken vessels, like me.
http://www.vergenetwork.org/2014/10/20/practical-tools-for-exhorting-one-another/
This quote from Spurgeon sums up how to think about the charges against me:
“Brother, if any man thinks ill of you, do not be angry with him; for you are worse than he thinks you to be. If he charges you falsely on some point, yet be satisfied, for if he knew you better he might change the accusation, and you would be no gainer by the correction. If you have your moral portrait painted, and it is ugly, be satisfied; for it only needs a few blacker touches, and it would be still nearer the truth.” – Charles Spurgeon.
Depravity - The Bible makes my wickedness very clear. Genesis 6:5 says "every inclination of the thoughts of the human heart was only evil all the time". I was born with a desperately wicked heart (Psalm 51:5). I have no merit of my own. Any charge you can find to bring against me, there is worse available. Much worse.
Propitiation - my favourite word (a life saver). When God calls me to Himself with a repentant heart, in simple faith, the eternal wrath of a Holy God has been removed, He has absolutely no record of anything ever having gone wrong in my life, and I am restored to relationship with Him, and treated as a son, irreversibly, and for ever (Titus 3:7).
Praise the God of restoration, praise the God who gives, and takes away. Let me always walk through life "sorrowful, yet always rejoicing" (2 Cor 6:10). I will always have sorrows, that is a fact of life, and yet in Christ I always have much more cause for rejoicing. Praise God that through these tough times he drives me closer into fellowship with other believers, and closer to the foot of his Throne in humble dependence on Him, and Him alone.Praise Him that he continues to work through broken vessels, like me.
http://www.vergenetwork.org/2014/10/20/practical-tools-for-exhorting-one-another/
(Spurgeon quote came from this very helpful article)
Thursday, October 09, 2014
Jehovah's Witnesses visit our home
Please note this post is descriptive, not prescriptive. I am not advising anyone to do this, I am simply describing what I did. Inviting well versed people from a cult into your home is not a safe thing to do. It could go badly wrong. But, in this case it didn't and although they said stuff I had no good answer to, I know this will only drive me deeper into the word, and into the doctrine I have come to believe. It will make my foundations more sure, and not weaken them.
Last Saturday I had a knock at the door, and it was two well dressed ladies from the local Jehovah's Witnesses. After thinking about how to deal with this encounter, and how I should prepare for it, well, here it was and I was unprepared. But, the opportunity was in front of me, so I asked them in. They said they couldn't, but they would come back another time, so I said that would be grand.
Well, last night they arrived again. It was one of the ladies, and her husband. I had done some reading, some listening, and some learning, but in my heart I really didn't want to pummel them with 2nd hand information as that seems a bit unfair. Better to deal with them as who I am, and from where I am. I am confident in my own faith, I am confident in my own theology, poor and all as my knowledge is. I know what I believe, even if I haven't got the basis for everything at hand.
So, they came in. And sat down. And we sort of looked at each other. I was expecting a pummelling with the standard JW speel, but that didn't come. So I told them that I don't think it is fair to fully form opinions on other communities without actually knowing anyone personally. So the guy started to explain some of the differences between what they believe and what 'Christians' believe.
He started with the Trinity, just giving an overview of their perceived roles of Jesus, God and the Holy Spirit. Then they told of how they don't give blood and the old testament background of that. They mentioned that they believe in Jesus, which they say surprises some people, they said they have even had people tell them they don't believe in Jesus. I do understand this as it seems they believe in a significantly different version of Jesus, but I was able to empathise with people telling me what I do or don't believe. They explained how they don't believe in hell. I listened interested, and attentively to all they had to say, asking for clarification many times throughout.
It is difficult to know where to start with something like this, but I knew Jesus talked a lot about hell, so I started by checking with them that they agreed that the entire Bible was the inspired word of God, and that it was an infallible source of information They agreed. Phew. We talked about a few references to hell, and they explained that they believe that it is just a second death, which is final, and is an annihilation a final end. To me this idea is quite attractive as I think I often don't have a proper appreciation for the seriousness of sin, and the punishment it requires. Anyway, we went through a few texts, which embarrassingly they helped me to find from my poor Biblical knowledge. One by one they were knocking them down, as it was possible to read them all through the lens of annihilation However we got to the words 'eternal fire' in Matthew 18:8 "And if your hand or your foot causes you to stumble, cut it off and throw it from you; it is better for you to enter life crippled or lame, than having two hands or two feet, to be cast into the eternal fire," The word eternal there signifies that it will be a punishment forever, not just temporary. It is not simply the fire that is eternal. Well, that was the best I could come up with, but I later found Rev 20:10 which is better: "And the devil that deceived them was cast into the lake of fire and brimstone, where the beast and the false prophet are, and shall be tormented day and night for ever and ever" not so ambiguous. Anyway, we can keep that one for next time.
Then we gradually worked our way around to works-based faith, and lack of assurance. I find it sad that their reading of the Bible cumulates in a lack of assurance, and it ends up a bit of a lottery as to whether you have done enough to please God. Anyway, i took them through various texts about the finished work of Christ, and about once for all, and so on. They brought up James, "faith without works", and I told them I agreed. But I told them that cause and effect are the other way around from what they believe. They believe that doing good works helps with their prospects of salvation. I explained that when a person is 'born again' or renewed, they repent of their old way of life (sins) and their heart and desires are changed, some instantly, some over time, but that is the actual moment of salvation. "There is now no condemnation" from that point on.
I explained this again with the old testament story of the two women who bring the baby to Solomon. He says cut it in two, and give the women half each - which causes one of the women to shout out, and say that the other could have the child. Now, here is a classic example (the best I know in fact) of an outworking of something hidden. The shout did not make the women the mother of the child. She was already the mother before that, but it wasn't possible to discern that fact visually, outwardly. The woman did not shout to become the mother of the child, she shouted because she already was the mother. She was the mother long before the dispute arose. In the same way we do not do good works to gain God's favour, but we do good works because we already have gained his favour. The works are an outward sign of an inward change that has already taken place. The JWs said they had never heard it explained like that before, and hadn't thought of it like that. For this I thank God, and pray that they will ponder this.
We also talked about true and false conversion, and how hating sin is a sign of true conversion, and about how it says that many will hear 'I never knew you'.
The conversation was gracious from both sides (I hope!) and I felt while it seemed that we agreed on some things we cam to an amicable disagreement on others. This is exactly how dialogue like this should go. Praise God.
We talked for about 2 hours in total, and covered many other topics too.
They said some interesting things, like about how little engagement they actually receive on the doorsteps. They said it was rare, and actually a bit scary to get invited into a home. They said it was unusual to meet a family (Susan and the kids were in the room for most of the time) who were devoted to and convicted by their Christian beliefs. They also said it was nice to discuss these things, rather than having people ram stuff down their throats - funny how they are scared of the same things that others fear about them!
At the end, when they left I felt it had went well. It wasn't as intimidating as I had expected Although they clearly knew their doctrine much better than I did, they didn't know everything and admitted it. They were just ordinary people.
I thank God for the help He gave me during this visit. He did not give me all the right texts, He did not instantly give me all the right answers, but through the faith He has given me, He helped me to show them what a genuine follower of Jesus Christ looks like, warts and all. All I can do now is pray that some of my foolishness will be turned into wisdom in their minds, by the one who created all things from nothing. I think that sounds quite feasible.
Last Saturday I had a knock at the door, and it was two well dressed ladies from the local Jehovah's Witnesses. After thinking about how to deal with this encounter, and how I should prepare for it, well, here it was and I was unprepared. But, the opportunity was in front of me, so I asked them in. They said they couldn't, but they would come back another time, so I said that would be grand.
Well, last night they arrived again. It was one of the ladies, and her husband. I had done some reading, some listening, and some learning, but in my heart I really didn't want to pummel them with 2nd hand information as that seems a bit unfair. Better to deal with them as who I am, and from where I am. I am confident in my own faith, I am confident in my own theology, poor and all as my knowledge is. I know what I believe, even if I haven't got the basis for everything at hand.
So, they came in. And sat down. And we sort of looked at each other. I was expecting a pummelling with the standard JW speel, but that didn't come. So I told them that I don't think it is fair to fully form opinions on other communities without actually knowing anyone personally. So the guy started to explain some of the differences between what they believe and what 'Christians' believe.
He started with the Trinity, just giving an overview of their perceived roles of Jesus, God and the Holy Spirit. Then they told of how they don't give blood and the old testament background of that. They mentioned that they believe in Jesus, which they say surprises some people, they said they have even had people tell them they don't believe in Jesus. I do understand this as it seems they believe in a significantly different version of Jesus, but I was able to empathise with people telling me what I do or don't believe. They explained how they don't believe in hell. I listened interested, and attentively to all they had to say, asking for clarification many times throughout.
It is difficult to know where to start with something like this, but I knew Jesus talked a lot about hell, so I started by checking with them that they agreed that the entire Bible was the inspired word of God, and that it was an infallible source of information They agreed. Phew. We talked about a few references to hell, and they explained that they believe that it is just a second death, which is final, and is an annihilation a final end. To me this idea is quite attractive as I think I often don't have a proper appreciation for the seriousness of sin, and the punishment it requires. Anyway, we went through a few texts, which embarrassingly they helped me to find from my poor Biblical knowledge. One by one they were knocking them down, as it was possible to read them all through the lens of annihilation However we got to the words 'eternal fire' in Matthew 18:8 "And if your hand or your foot causes you to stumble, cut it off and throw it from you; it is better for you to enter life crippled or lame, than having two hands or two feet, to be cast into the eternal fire," The word eternal there signifies that it will be a punishment forever, not just temporary. It is not simply the fire that is eternal. Well, that was the best I could come up with, but I later found Rev 20:10 which is better: "And the devil that deceived them was cast into the lake of fire and brimstone, where the beast and the false prophet are, and shall be tormented day and night for ever and ever" not so ambiguous. Anyway, we can keep that one for next time.
Then we gradually worked our way around to works-based faith, and lack of assurance. I find it sad that their reading of the Bible cumulates in a lack of assurance, and it ends up a bit of a lottery as to whether you have done enough to please God. Anyway, i took them through various texts about the finished work of Christ, and about once for all, and so on. They brought up James, "faith without works", and I told them I agreed. But I told them that cause and effect are the other way around from what they believe. They believe that doing good works helps with their prospects of salvation. I explained that when a person is 'born again' or renewed, they repent of their old way of life (sins) and their heart and desires are changed, some instantly, some over time, but that is the actual moment of salvation. "There is now no condemnation" from that point on.
I explained this again with the old testament story of the two women who bring the baby to Solomon. He says cut it in two, and give the women half each - which causes one of the women to shout out, and say that the other could have the child. Now, here is a classic example (the best I know in fact) of an outworking of something hidden. The shout did not make the women the mother of the child. She was already the mother before that, but it wasn't possible to discern that fact visually, outwardly. The woman did not shout to become the mother of the child, she shouted because she already was the mother. She was the mother long before the dispute arose. In the same way we do not do good works to gain God's favour, but we do good works because we already have gained his favour. The works are an outward sign of an inward change that has already taken place. The JWs said they had never heard it explained like that before, and hadn't thought of it like that. For this I thank God, and pray that they will ponder this.
We also talked about true and false conversion, and how hating sin is a sign of true conversion, and about how it says that many will hear 'I never knew you'.
The conversation was gracious from both sides (I hope!) and I felt while it seemed that we agreed on some things we cam to an amicable disagreement on others. This is exactly how dialogue like this should go. Praise God.
We talked for about 2 hours in total, and covered many other topics too.
They said some interesting things, like about how little engagement they actually receive on the doorsteps. They said it was rare, and actually a bit scary to get invited into a home. They said it was unusual to meet a family (Susan and the kids were in the room for most of the time) who were devoted to and convicted by their Christian beliefs. They also said it was nice to discuss these things, rather than having people ram stuff down their throats - funny how they are scared of the same things that others fear about them!
At the end, when they left I felt it had went well. It wasn't as intimidating as I had expected Although they clearly knew their doctrine much better than I did, they didn't know everything and admitted it. They were just ordinary people.
I thank God for the help He gave me during this visit. He did not give me all the right texts, He did not instantly give me all the right answers, but through the faith He has given me, He helped me to show them what a genuine follower of Jesus Christ looks like, warts and all. All I can do now is pray that some of my foolishness will be turned into wisdom in their minds, by the one who created all things from nothing. I think that sounds quite feasible.
Monday, August 25, 2014
Kitesurfing - 25th August 2014
There is no kitesurfing for 6 months, and then 3 nights in less than a week. Tonight was east wind, which I'm not fond of, seemed quite strong when I got there, so I set up the 9, but it was clearly not enough, so I set up the 12.
Out on the water for a good while, mowing the lawn at the start, but working on toeside and even some powered jumps in the right to left direction.
There were almost no breaking waves, but it was odd on the way out, it was like constantly riding over a sine wave, which was actually quite tricky to do. It reminded me a bit of Magilligan point, in the mouth of the Foyle.
The best thing of all was getting to surf through the sunset, at about 8:40pm or so. Lovely.
Out on the water for a good while, mowing the lawn at the start, but working on toeside and even some powered jumps in the right to left direction.
There were almost no breaking waves, but it was odd on the way out, it was like constantly riding over a sine wave, which was actually quite tricky to do. It reminded me a bit of Magilligan point, in the mouth of the Foyle.
The best thing of all was getting to surf through the sunset, at about 8:40pm or so. Lovely.
Friday, August 22, 2014
Kitesurfing - Fri 22nd Aug 2014
Another night's kiting this week! Tonight I did a big downwinder from the mouth of the beach (Benone) to the river.
The wind was great, and the waves made better ramps than Tuesday night. I was going well, it seemed to blow up a bit as we went back up the beach to start again, and when I got back to the starting place, the wind dropped.
I tried, but I failed, the kite went down, wet, little wind, trouble relaunching, so I quit. Kite was soaked, and I was a bit disappointed. Maybe another time :/
The wind was great, and the waves made better ramps than Tuesday night. I was going well, it seemed to blow up a bit as we went back up the beach to start again, and when I got back to the starting place, the wind dropped.
I tried, but I failed, the kite went down, wet, little wind, trouble relaunching, so I quit. Kite was soaked, and I was a bit disappointed. Maybe another time :/
Tuesday, August 19, 2014
Kitesurfing - Tuesday 19th August 2014
Tonight's forecast has been good, so even after a pre-6am start I decided to take a short run to the beach tonight.
It was well worth it, the wind was a good westerly direction, although the ramps weren't there as much as I'd like them to be.
I was a bit worried about the whole thing, as it is many months since I've been out, but the mice hadn't eaten my kite, I remembered where the blue and red lines went, and I also seemed to manage to kitesurf without undue amounts of falling in.
A grand evening out.
It was well worth it, the wind was a good westerly direction, although the ramps weren't there as much as I'd like them to be.
I was a bit worried about the whole thing, as it is many months since I've been out, but the mice hadn't eaten my kite, I remembered where the blue and red lines went, and I also seemed to manage to kitesurf without undue amounts of falling in.
A grand evening out.
Tuesday, May 13, 2014
Marriage
I read this quote and it hit me hard:
"I did not love my wife as Christ loves the church; instead of laying down my life for her,
I wanted her to lay her life down for me."

Saturday, April 05, 2014
Tunnelling VNC (or anything) over ssh
To set up a tunnel to reach a vnc server running on port 5901 of remote_host, it is possible to tunnel the port over an ssh connection. Then you just connect to localhost:5901
ssh -C -L 5901:localhost:5901 -N -f -l remote_user -p 22 remote_host
So that is:
ssh -C -L local_port:localhost:remote_host_port -N -f -l remote_user -p 22 remote_host
Friday, March 28, 2014
c# update clock display once per second
For my heating controls project I display a clock on my main screen. It is just a label which I set the time in. Previously I had used a System.Threading.Timer with an interval of 50ms to do the updates, and this works fine, but on mono on the Raspberry Pi it takes up too much CPU. Top was showing that the process was taking 8-10% of the CPU when at idle.
The problem is that if you set a timer to run every 1000ms, sometimes expirations will be slightly longer, meaning that if you watch the clock every now and then it will skip displaying a second. If you go for something like 900ms update, that doesn't work either, you get 9 short seconds and one long one.
Googling turned up this stackoverflow article, and it contains the answer that got me started, but I wanted it to be a little more versatile. I wanted a timer that I could configure to fire every 'x' ms, and I could either set it to 1000, for each second, or if that was still too CPU hungry I could set it to 60000, which would only update the clock once per minute.
In my form_load I initialise the timer.
clockUpdateTimer = new System.Timers.Timer();
clockUpdateTimer.Elapsed += clockTimer_Elapsed;
clockUpdateTimer.Interval = 100;
clockUpdateTimer.Start();
The problem is that if you set a timer to run every 1000ms, sometimes expirations will be slightly longer, meaning that if you watch the clock every now and then it will skip displaying a second. If you go for something like 900ms update, that doesn't work either, you get 9 short seconds and one long one.
Googling turned up this stackoverflow article, and it contains the answer that got me started, but I wanted it to be a little more versatile. I wanted a timer that I could configure to fire every 'x' ms, and I could either set it to 1000, for each second, or if that was still too CPU hungry I could set it to 60000, which would only update the clock once per minute.
In my form_load I initialise the timer.
clockUpdateTimer = new System.Timers.Timer();
clockUpdateTimer.Elapsed += clockTimer_Elapsed;
clockUpdateTimer.Interval = 100;
clockUpdateTimer.Start();
I set the initial interval to 100ms which means my clockTimer_Elapsed() method gets its first call pretty much straight away.
private long updateMainScreenIntervalMs = 1000;
private void clockTimer_Elapsed(object sender, System.Timers.ElapsedEventArgs e)
{
clockUpdateTimer.Stop();
TimerCallback(sender);
//start the timer to run until 200ms after the next clock second boundary
long timeInMs = System.DateTime.Now.Ticks / TimeSpan.TicksPerMillisecond;
long wait = (updateMainScreenIntervalMs * (timeInMs / updateMainScreenIntervalMs + 1)) - timeInMs;
//Debug.WriteLine("wait ms: " + wait);
clockUpdateTimer.Interval = (int)wait + 200;
clockUpdateTimer.Start();
}
This method firstly stops the existing timer, and then calls my callback method to update the label (TimerCallback()). Next I get timeInMs which is the current system time in milliseconds. Then I do some maths which essentially finds the nearest full cycle of time, and subtracting the current time from this value figures out how long we have to wait until this time.
Then I start the timer with that time. For a 1 second interval it typically waits about 750ms.
Any improvements welcome, if it helps you please post a comment!
Kitesurfing - Friday 28th March 2014
I got to Benone just after an early exit to work, so I was there for about 4:20. It was blowing about 25 on my wind meter, so I set up the 9. However, after a couple of runs showed me that it was too small. The 12 was too big, but I'd rather be overpowered than underpowered.
It was a great session, long flats, nice waves. The only funny thing was the direction was East, which meant I was going the opposite way to normal, but it was still good practice, and it meant that I was able to ride a little toeside out over the breaking waves.
The water is still cold, and it felt even colder when I took my wetsuit socks off, feet were freezing, but at least I could feel the board. I really don't like having something on my feet, I find it very tricky.
It was a great session, long flats, nice waves. The only funny thing was the direction was East, which meant I was going the opposite way to normal, but it was still good practice, and it meant that I was able to ride a little toeside out over the breaking waves.
The water is still cold, and it felt even colder when I took my wetsuit socks off, feet were freezing, but at least I could feel the board. I really don't like having something on my feet, I find it very tricky.
Monday, March 24, 2014
Heating Touchscreen Screen Captures
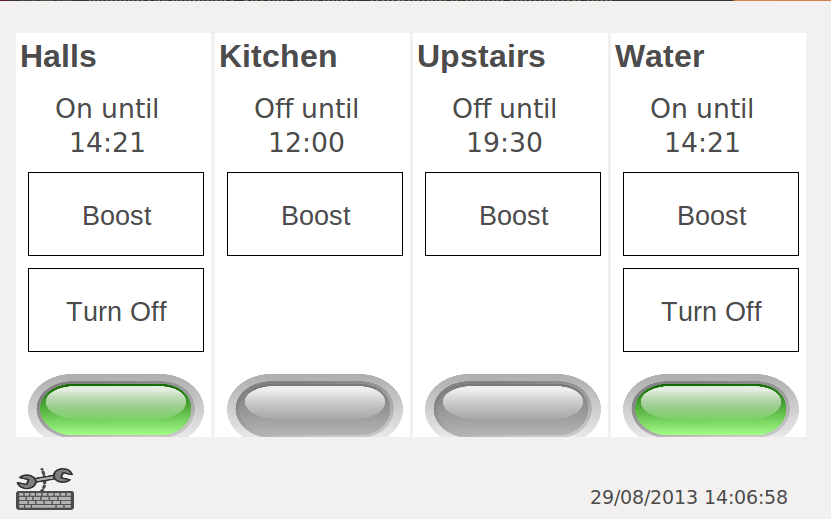
I have made a few updates to my touchscreen client, and one of those has been a bit of work on the visual aspect. A few screenshots are posted below. (the windows are all border-less on mono, but display with borders for debugging on Windows)

Main Screen

PIN input form

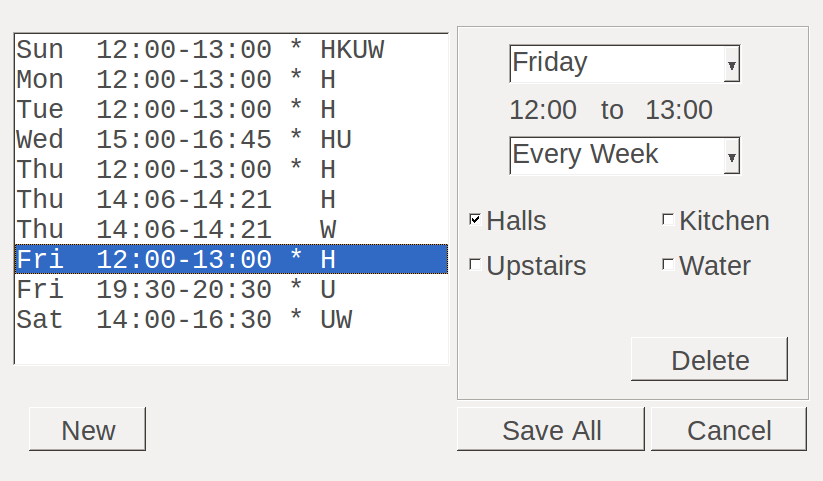
Program Entry

Time entry for a specific program

System settings dialog (not themed)
Wednesday, March 12, 2014
How to hold modules from apt-get update
Recently I had to do an update, but the bootloader update broke my touchscreen driver. So I wanted to do an update without updating the bootloader, so I had to run this command:
sudo apt-mark hold libraspberrypi-bin libraspberrypi-dev libraspberrypi-doc libraspberrypi0 raspberrypi-bootloader
sudo apt-mark hold libraspberrypi-bin libraspberrypi-dev libraspberrypi-doc libraspberrypi0 raspberrypi-bootloader
Tuesday, December 24, 2013
Win32 Disk Imager - when the image is too big (Raspberry Pi)
When attempting to use Win32 Disk Imager put a 4Gb image onto a different 4Gb memory card, I got this error

"Not enough space on disk: Size 7809024 sectors Available: 7744512 sectors Sector size: 512"
So basically the 4Gb cards have a slightly different size. What I have here is a workaround, and it's definitely not guaranteed to work, but it may be worth a try. Get yourself a Ubuntu computer (I just boot a laptop from a live CD) and run these commands (changing paths where appropriate):
1) Run dd to copy as much of the image as possible to the SD card - this takes quite a while to complete, depending on the write speed of your card. I think for me it took about 15 minutes, and it prints no status until it fails - (update with status=progress at the end of the line in a modern version of dd, it will show progress on the console)
ubuntu@ubuntu:/$ sudo dd if=/media/ubuntu/62B85E4EB85E2139/Downloads/2013-09-02-deployed\(RC3\).img of=/dev/mmcblk0 status=progress
dd: writing to `/dev/mmcblk0': No space left on device
7744513+0 records in
7744512+0 records out
3965190144 bytes (4.0 GB) copied, 1914.1 s, 2.1 MB/s
2) Run fsck to see what size your physical device is.
ubuntu@ubuntu:/$ sudo fsck.ext4 /dev/mmcblk0p2
e2fsck 1.42.5 (29-Jul-2012)
The filesystem size (according to the superblock) is 960768 blocks
The physical size of the device is 952704 blocks
Either the superblock or the partition table is likely to be corrupt!
Abort? yes
3) Run resize2fs to change the superblock size to match the physical size (you need to replace 952704 with whatever output you got from step 2)
ubuntu@ubuntu:/$ sudo resize2fs /dev/mmcblk0p2 952704
resize2fs 1.42.5 (29-Jul-2012)
Resizing the filesystem on /dev/mmcblk0p2 to 952704 (4k) blocks.
The filesystem on /dev/mmcblk0p2 is now 952704 blocks long.
4) You're all set - run fsck again to see a good printout, and then pop your card into your pi and it *should* boot!
ubuntu@ubuntu:/$ sudo fsck.ext4 /dev/mmcblk0p2
e2fsck 1.42.5 (29-Jul-2012)
/dev/mmcblk0p2: clean, 78371/245760 files, 622522/952704 blocks
I understand that this works by truncating the filesystem, in the blind hope that the end of the filesystem has nothing written to it, and is therefore only empty space anyway. Like I said there is the possibility for this to go wrong, YMMV.

"Not enough space on disk: Size 7809024 sectors Available: 7744512 sectors Sector size: 512"
So basically the 4Gb cards have a slightly different size. What I have here is a workaround, and it's definitely not guaranteed to work, but it may be worth a try. Get yourself a Ubuntu computer (I just boot a laptop from a live CD) and run these commands (changing paths where appropriate):
1) Run dd to copy as much of the image as possible to the SD card - this takes quite a while to complete, depending on the write speed of your card. I think for me it took about 15 minutes, and it prints no status until it fails - (update with status=progress at the end of the line in a modern version of dd, it will show progress on the console)
ubuntu@ubuntu:/$ sudo dd if=/media/ubuntu/62B85E4EB85E2139/Downloads/2013-09-02-deployed\(RC3\).img of=/dev/mmcblk0 status=progress
dd: writing to `/dev/mmcblk0': No space left on device
7744513+0 records in
7744512+0 records out
3965190144 bytes (4.0 GB) copied, 1914.1 s, 2.1 MB/s
2) Run fsck to see what size your physical device is.
ubuntu@ubuntu:/$ sudo fsck.ext4 /dev/mmcblk0p2
e2fsck 1.42.5 (29-Jul-2012)
The filesystem size (according to the superblock) is 960768 blocks
The physical size of the device is 952704 blocks
Either the superblock or the partition table is likely to be corrupt!
Abort
3) Run resize2fs to change the superblock size to match the physical size (you need to replace 952704 with whatever output you got from step 2)
ubuntu@ubuntu:/$ sudo resize2fs /dev/mmcblk0p2 952704
resize2fs 1.42.5 (29-Jul-2012)
Resizing the filesystem on /dev/mmcblk0p2 to 952704 (4k) blocks.
The filesystem on /dev/mmcblk0p2 is now 952704 blocks long.
4) You're all set - run fsck again to see a good printout, and then pop your card into your pi and it *should* boot!
ubuntu@ubuntu:/$ sudo fsck.ext4 /dev/mmcblk0p2
e2fsck 1.42.5 (29-Jul-2012)
/dev/mmcblk0p2: clean, 78371/245760 files, 622522/952704 blocks
I understand that this works by truncating the filesystem, in the blind hope that the end of the filesystem has nothing written to it, and is therefore only empty space anyway. Like I said there is the possibility for this to go wrong, YMMV.
Friday, October 04, 2013
eGalax USB touchscreen power consumption problem on Raspberry pi
I have deployed my eGalax touchscreen in production now, but I encountered a problem where very rarely the touchscreen would stop responding to touch input. I noticed errors like this in the logs:
/var/log/messages
lots of lines like:
Sep 20 09:42:42 hall-heat kernel: [759582.629937] usb 1-1.3: Manufacturer: eGalax Inc.
Sep 20 09:42:42 hall-heat kernel: [759582.641175] usbtouchscreen: probe of 1-1.3:1.0 failed with error -32
... [and ]...
As my main pi was now in production, I am using a really old Model B as my development environment. I noticed that if I power it up with the USB plugged in that it fails to boot with an error and corrupts the SD card, so that no further boots are possible
From a lot of googling I pieced together that it was a power issue - the USB touch controller, although it's only a tiny board, it seems to draw quite a lot of current from the USB port of the pi, which has occasional problems with my new pi, and very regular problems with the older model.
I bought one of these cables from linitx (http://linitx.com/product/5v-power-injector-for-usb-on-rb411uahr-and-rb493g) which allows power to be injected through the USB.

After receiving it I got my tester out and was disappointed to find that it still had the 5V line connected through. So I stripped off the insulation, and began to cut wires, thinking it would be a red one, however in this cable it turned out to be the black one. Coincidentally I ordered another one, and it turned out to be the red wire, so do some testing before you do any cutting.
I installed my new cable in my old Model B test system, and booted it up - perfect! This instantly solved the problems.
So, if you see problems at boot, or have problems with USB devices failing after some time, think power.
/var/log/messages
lots of lines like:
Sep 20 09:42:42 hall-heat kernel: [759582.629937] usb 1-1.3: Manufacturer: eGalax Inc.
Sep 20 09:42:42 hall-heat kernel: [759582.641175] usbtouchscreen: probe of 1-1.3:1.0 failed with error -32
... [and ]...
Sep 20 09:42:44 hall-heat kernel: [759584.833718] usb 1-1.3: USB disconnect, device number 90
Sep 20 09:42:44 hall-heat kernel: [759585.070521] usb 1-1.3: new low-speed USB device number 91 using dwc_otg
Sep 20 09:42:45 hall-heat kernel: [759585.530595] usb 1-1.3: new low-speed USB device number 92 using dwc_otg
Sep 20 09:42:45 hall-heat kernel: [759585.990652] usb 1-1.3: new low-speed USB device number 93 using dwc_otg
...
and in /var/log/syslog
Sep 20 09:39:55 hall-heat kernel: [759416.317257] usb 1-1.3: new low-speed USB device number 18 using dwc_otg
Sep 20 09:39:56 hall-heat kernel: [759416.426528] usb 1-1.3: New USB device found, idVendor=0eef, idProduct=0001
Sep 20 09:39:56 hall-heat kernel: [759416.426558] usb 1-1.3: New USB device strings: Mfr=1, Product=2, SerialNumber=0
Sep 20 09:39:56 hall-heat kernel: [759416.426577] usb 1-1.3: Product: USB TouchController
Sep 20 09:39:56 hall-heat kernel: [759416.426592] usb 1-1.3: Manufacturer: eGalax Inc.
Sep 20 09:39:56 hall-heat kernel: [759416.435420] input: eGalax Inc. USB TouchController as /devices/platform/bcm2708_usb/usb1/1-1/1-1.3/1-1.3:1.0/input/input115
Sep 20 09:40:04 hall-heat kernel: [759424.789468] usb 1-1.3: USB disconnect, device number 18
Sep 20 09:40:11 hall-heat kernel: [759431.427539] usb 1-1.3: new low-speed USB device number 21 using dwc_otg
Sep 20 09:40:11 hall-heat kernel: [759431.767454] usb 1-1.3: new low-speed USB device number 22 using dwc_otg
Sep 20 09:40:11 hall-heat kernel: [759431.847452] usb 1-1.3: device descriptor read/64, error -32
Sep 20 09:40:11 hall-heat kernel: [759432.217494] usb 1-1.3: new low-speed USB device number 23 using dwc_otg
Sep 20 09:40:12 hall-heat kernel: [759432.597579] usb 1-1.3: new low-speed USB device number 24 using dwc_otg
Sep 20 09:40:12 hall-heat kernel: [759432.677575] usb 1-1.3: device descriptor read/64, error -32
Sep 20 09:40:13 hall-heat kernel: [759433.477560] usb 1-1.3: new low-speed USB device number 25 using dwc_otg
Sep 20 09:40:13 hall-heat kernel: [759433.557573] usb 1-1.3: device descriptor read/64, error -32
Sep 20 09:40:13 hall-heat kernel: [759433.747461] usb 1-1.3: device descriptor read/64, error -32
Sep 20 09:40:49 hall-heat kernel: [759469.502121] ERROR::dwc_otg_hcd_urb_enqueue:514: Not connected
Sep 20 09:40:49 hall-heat kernel: [759469.502121]
Sep 20 09:40:49 hall-heat kernel: [759469.502160] phy0 -> rt2x00usb_vendor_request: Error - Vendor Request 0x06 failed for offset 0x131c with error -19.
Sep 20 09:40:49 hall-heat kernel: [759469.738105] usb 1-1: USB disconnect, device number 2
Sep 20 09:40:49 hall-heat kernel: [759469.738135] usb 1-1.1: USB disconnect, device number 3
Sep 20 09:40:49 hall-heat kernel: [759469.738457] smsc95xx 1-1.1:1.0: eth0: unregister 'smsc95xx' usb-bcm2708_usb-1.1, smsc95xx USB 2.0 Ethernet
Sep 20 09:40:49 hall-heat kernel: [759469.750967] usb 1-1.2: USB disconnect, device number 4
Sep 20 09:40:49 hall-heat kernel: [759470.278132] Indeed it is in host mode hprt0 = 00021501
Sep 20 09:40:50 hall-heat kernel: [759470.738290] usb 1-1: new high-speed USB device number 28 using dwc_otg
Sep 20 09:40:50 hall-heat kernel: [759470.738792] Indeed it is in host mode hprt0 = 00001101
Sep 20 09:40:50 hall-heat ifplugd(eth0)[1701]: Exiting.
As my main pi was now in production, I am using a really old Model B as my development environment. I noticed that if I power it up with the USB plugged in that it fails to boot with an error and corrupts the SD card, so that no further boots are possible
From a lot of googling I pieced together that it was a power issue - the USB touch controller, although it's only a tiny board, it seems to draw quite a lot of current from the USB port of the pi, which has occasional problems with my new pi, and very regular problems with the older model.
I bought one of these cables from linitx (http://linitx.com/product/5v-power-injector-for-usb-on-rb411uahr-and-rb493g) which allows power to be injected through the USB.
After receiving it I got my tester out and was disappointed to find that it still had the 5V line connected through. So I stripped off the insulation, and began to cut wires, thinking it would be a red one, however in this cable it turned out to be the black one. Coincidentally I ordered another one, and it turned out to be the red wire, so do some testing before you do any cutting.
I installed my new cable in my old Model B test system, and booted it up - perfect! This instantly solved the problems.
So, if you see problems at boot, or have problems with USB devices failing after some time, think power.
Monday, September 30, 2013
Raspberry Pi - turn off HDMI after a specified period of time using xscreensaver
for my application I've set up xscreensaver ('sudo apt-get install xscreensaver' and reboot, use 'xscreensaver-demo' to configure it) to blank my 7" eGalax touchscreen after 10 minutes, but when it's left unattended for 12 hours the backlight is still on. The screen sleeping options don't work in xscreensaver, so I rolled my own solution.
I'd appreciate suggestions if it isn't the best solution. It should work for others too.
Step 1 - Create scripts that manually turn off and on the HDMI
- create file hdmi_off.sh
- create file hdmi_on.sh (make sure to set executable permissions on both - 'chmod 755 *sh')
You should make sure these scripts work from the command line for you - all my other script does is call them, so if these do not work it will not work. Stop here until you get them working. You'll have to search the forums to find how to make your screen come on, and start displaying stuff.
Step 2 - Create a perl script to detect the screensaver state
Basically we can use "xscreensaver-command -watch" to follow text output of what xscreensaver is doing. What I do is detect when the screensaver becomes active, then start a timer to determine when to turn the screen off. It is a lot simpler if you just want the screen to power off immediately. But I wanted this dual off approach as it takes the screen longer to come on when its fully off.
Step 3 - make the script run all the time
Make an inittab entry to make the perl script run all the time ('sudo vi /etc/inittab' and add the line to the bottom
Save the file, exit the editor, and then type 'sudo init q' to make the system re-read the file. 'ps -ef' should now list your script.
I'd appreciate suggestions if it isn't the best solution. It should work for others too.
Step 1 - Create scripts that manually turn off and on the HDMI
- create file hdmi_off.sh
- CODE: SELECT ALL
#!/bin/sh
#hdmi_off.sh - shell script to turn HDMI off - should work universially
tvservice -o
- create file hdmi_on.sh (make sure to set executable permissions on both - 'chmod 755 *sh')
- CODE: SELECT ALL
#!/bin/sh

#hdmi_on.sh - custom script to turn HDMI on

#get the current tv state
tvstate=`tvservice -s | grep HDMI | wc -l`

#only turn on if its not already on
if [ "$tvstate" -eq 0 ]
then
   tvservice --explicit="DMT 87"
   fbset -depth 8
   fbset -depth 16
   xrefresh
else
   echo "HDMI already on";
fi

exit;
You should make sure these scripts work from the command line for you - all my other script does is call them, so if these do not work it will not work. Stop here until you get them working. You'll have to search the forums to find how to make your screen come on, and start displaying stuff.
Step 2 - Create a perl script to detect the screensaver state
Basically we can use "xscreensaver-command -watch" to follow text output of what xscreensaver is doing. What I do is detect when the screensaver becomes active, then start a timer to determine when to turn the screen off. It is a lot simpler if you just want the screen to power off immediately. But I wanted this dual off approach as it takes the screen longer to come on when its fully off.
- CODE: SELECT ALL
#!/usr/bin/perl

#check_screen_state.pl - perl script to monitor screen state, and turn HDMI on or off
use strict;
use warnings;
use threads;
use Thread::Queue;
$|=1;

my $counter=-1;
#time in seconds
my $time_to_power_off_screen = 1200; #20 minutes
my $hdmi_off_command = "/home/pi/screensaver/hdmi_off.sh";
my $hdmi_on_command = "/home/pi/screensaver/hdmi_on.sh";

#code to run a shell command in a thread, and get output from it
sub pipeCommand {
    my $cmd = shift;
    my $Q = new Thread::Queue;
    async{
        my $pid = open my $pipe, $cmd or die $!;
        $Q->enqueue( $_ ) while <$pipe>;
        $Q->enqueue( undef );
    }->detach;
    return $Q;
}

my $pipe = pipeCommand(
    'xscreensaver-command -watch |'
) or die;

print_("Starting, waiting on input.\n");
while( 1 ) {
    if( $pipe->pending ) {
        my $line = $pipe->dequeue or last;
        print_("$line");
      if ($line =~ m/^(BLANK|LOCK)/) {
         $counter = $time_to_power_off_screen;
      } elsif ($line =~ m/^UNBLANK/) {
         if($counter <= 0){
            print_( "turn on\n");
            print_( `$hdmi_on_command `);
         }else{
            print_("screen already on\n");
         }
         $counter=-1;
       }
    }
    else {
        sleep 1;
      if($counter >0){
         $counter--;
      }

      if($counter == 0){
         $counter=-1;
         print_( "turn off acter $time_to_power_off_screen seconds\n");
         print_(`$hdmi_off_command`);
      }
    }
}

sub print_{
   print "[".localtime(time) .  "] @_";
}
Step 3 - make the script run all the time
Make an inittab entry to make the perl script run all the time ('sudo vi /etc/inittab' and add the line to the bottom
- CODE: SELECT ALL
hdmi:2345:respawn:/usr/bin/perl /home/pi/screensaver/check_screen_state.pl > /home/pi/screensaver/hdmi.log
Save the file, exit the editor, and then type 'sudo init q' to make the system re-read the file. 'ps -ef' should now list your script.
Wednesday, September 18, 2013
Heating control weather compensation
This time of year the temperature can vary widely in the mornings. Some mornings it can be 13/14 degrees, in which case there is no need for heating, and other days it can be well below 10, which can be pretty chilly!
I decided to have a quick go at a bit of simple weather compensation for my heating control system. Rather than adding it into my server software I decided to write a simple perl script that acts as a client.
First thing is to scrape the temperature from wunderground.com. Using lynx and getting the text in perl is easy.
Then for getting the programs into the server, I considered various complicated options, but then I thought of having a couple of pre-cooked programs based on temperature ranges. So in my script I determine which of 3 ranges it is in, currently less than 3 degrees, 3-9, 9-13 or 13+ and send a set of commands to the server based on the outcome.
I decided to have a quick go at a bit of simple weather compensation for my heating control system. Rather than adding it into my server software I decided to write a simple perl script that acts as a client.
First thing is to scrape the temperature from wunderground.com. Using lynx and getting the text in perl is easy.
Then for getting the programs into the server, I considered various complicated options, but then I thought of having a couple of pre-cooked programs based on temperature ranges. So in my script I determine which of 3 ranges it is in, currently less than 3 degrees, 3-9, 9-13 or 13+ and send a set of commands to the server based on the outcome.
use strict;
use warnings;

use Net::Telnet;
use Data::Dumper;

my $host = "localhost";
my $port = 2349;

$|=1;


my $command = "lynx  --dump http://www.wunderground.com/q/zmw:00000.1.WEGAE";

print "Retrieve weather data...";
my $current_weather = `$command`;
print "\n";


#use the feels like temperature
#   Feels Like 12 °C
#   Feels Like 12.5 °C
my $temp = -99;
if(($temp) = $current_weather =~ /Feels Like\s+(.*?)\s+/){
 print "Temperature is $temp\n";
 if($temp > 13){
  print "temp too high, doing nothing\n";
 } elsif ($temp > 9) {
  #warmest programs
  send_programs("p_warm.txt");
 } elsif ($temp > 3) {
  #medium
  send_programs("p_medium.txt");
 } else {
  #coldest temp program
  send_programs("p_cold.txt");
 }
}


sub send_programs{
 my ($file) = @_;
 print "About to use data from file $file \n";

 my $t    = new Net::Telnet( Timeout => 5, Dump_Log => "dump.log.filename.txt" );
 $t->open( Host => $host, Port => $port );
 $t->put("ClientName Perl Weather Compensation ($temp)\n");

 open(IN, $file) || die "cant read file $file : $!";
 while(my $line = <IN>)
 {
  chomp $line;
  #replace multiple spaces with singles
  $line=~s/\s+/ /g;
  print "send: $line\n";
  $t->put("$line\n");
 }


}
Thursday, September 05, 2013
Raspberry pi boot straight into a GUI application
I wanted the pi to automatically start x and run my mono application but I don't need a pile of menus etc, so I googled a bit, but couldn't find an article that really did what I want.
I followed the instructions in this article with some additions.
Step 1: add startx to /etc/rc.local
Step 3: add your application to ~/.xinitrc
I deviated here a bit, to run my mono app I wrapped it in a perl script, which monitors STDOUT and STDERR because I found that there can occasionally be exceptions which cause the program to stop being displayed, but the mono process does not exit. I monitor the output for /exception: read failure/i and if it is in the output, I kill the process and start another. I'll post the script if anyone wants it.
These steps are enough to start x and run my app, but its actually pretty much the same as running the standard LXDE with an autostart entry.
Step 4: Change the x-session-manager
Step 5: Add a startup background
I discovered that x starts pretty quickly, but it leaves the background black for quite a while before it begins to draw my application. So I want to display a png file in the background while my app is starting.
Step 6: remove the normal raspi-config start x
Finally run raspi-config, and change the pi so it doesnt automatically try to start x through the init method.
This solution works perfectly for me, I don't mind some text scrolling on startup, but I know there are ways to get rid of that too. Now there is no overhead of menus etc, and the only app running in the GUI is mine. Job done.
I followed the instructions in this article with some additions.
Step 1: add startx to /etc/rc.local
#/etc/rc.local
sudo -u pi startx &
sudo dpkg-reconfigure x11-common
Step 3: add your application to ~/.xinitrc
I deviated here a bit, to run my mono app I wrapped it in a perl script, which monitors STDOUT and STDERR because I found that there can occasionally be exceptions which cause the program to stop being displayed, but the mono process does not exit. I monitor the output for /exception: read failure/i and if it is in the output, I kill the process and start another. I'll post the script if anyone wants it.
These steps are enough to start x and run my app, but its actually pretty much the same as running the standard LXDE with an autostart entry.
Step 4: Change the x-session-manager
sudo update-alternatives --config x-session-manager
Step 5: Add a startup background
I discovered that x starts pretty quickly, but it leaves the background black for quite a while before it begins to draw my application. So I want to display a png file in the background while my app is starting.
sudo apt-get install feh
#~/.xinitrc
export DISPLAY=:0
xscreensaver -no-splash &
feh /home/pi/images/starting_background.png &
/home/pi/mono/Debug/runGUI.pl
Step 6: remove the normal raspi-config start x
sudo raspi-config
This solution works perfectly for me, I don't mind some text scrolling on startup, but I know there are ways to get rid of that too. Now there is no overhead of menus etc, and the only app running in the GUI is mine. Job done.
Raspberry pi mono hide cursor
It seems to be quite a common problem getting the cursor to hide in an application running on x-windows. The mono implementation of c# winforms doesn't currently support Cursor.Hide() functionality at all.
I began by using unclutter which monitors the x-display and hides the cursor very quickly after any movement, but it is still visible, and if the CPU is busy it can be visible for some time.
However, an article from microsoft helped me solve it. I downloaded a blank cursor file from some random website, and added the blank.cur to my project as an embedded resource. This code which I placed in my form_load method then replaces the normal cursor with the blank one:
I began by using unclutter which monitors the x-display and hides the cursor very quickly after any movement, but it is still visible, and if the CPU is busy it can be visible for some time.
However, an article from microsoft helped me solve it. I downloaded a blank cursor file from some random website, and added the blank.cur to my project as an embedded resource. This code which I placed in my form_load method then replaces the normal cursor with the blank one:
this.Cursor = new Cursor(GetType(), "blank.cur");
Easy, and very effective for my fullscreen touchscreen mono app running on my 7" eGalax touchscreen from the raspberry pi.
Raspberry Pi Hall Heating Controller
Introduction
About six years ago I created and installed a proprietary system for controlling our central heating. The setup was client-server, where the server was C# software running on a Win32 box, using RS232 to control a VIOM unit, which in turn activated relays to turn the zones on and off. There is no thermostatic control in this software, it is simply time based on/off programs. The main aim was to make a piece of software that would allow easy setting of time programs.
A few months ago I decided to rewrite my software for the pi. I did a little research to make sure that the pi could do all I needed, which is basically a bit of I/O and run 24/7, reliably. This has been running now for a few months without any problem.
A new application – Church hall
I noticed another application in that our local church hall has an outdated clock based heating system. In this system there are four zones, configured by switches that are inaccessible to users, and therefore mostly set to on. The timing is handled by one timer which controls all zones together. This sounds like an application that could be dramatically enhanced by my existing software.
GUI
At home I have no need for a display, as there are LEDs for system status, and a windows PC based GUI for program setting. In this new location I would need to create some sort of GUI to display on the unit.
I found eGalax touchscreens on eBay which could be bought from China for about £50. I ordered one and using some instructions I got the touchscreen configured and working. After some deliberating around JavaFX I decided that my simplest solution would be to go for another WinForms application, running on the pi using mono. I wrote a really simple WinForms app and put it onto the pi, with mono SimpleApp.exe up it popped on the display. Over a few iterations I tested some button handlers, and also TCP/IP code to connect to my java server software, and it all worked as expected.
When I discovered mono worked so well I took the bold approach of just linking to my existing classes for communication and programming used in my regular WinForm application, which have built-in resilience if the server goes down, useful enums, and code for handling all the time programming required. I was pleased to see that it all worked.
With the mechanics in place, it came to the more difficult aspect of designing the GUI. I went through quite a few iterations on paper to decide what was required on the screen, and how it should be laid out, and in the end decided that there should be four horizontal panels side-by-side, one for each zone. I would stick with my familiar paradigm of displaying the zone name at the top, and then text showing if the zone is on or off, and what time the next event is at. Below this is a button to boost and a button to turn off. At the bottom there is an image which shows grey when the zone is off, and green when it is on.
The next problem to solve was how to easily set programs. After a few iterations I came up with a dialog for that too, that is accessible from a settings icon on the main screen.
Programs can be added, removed or amended from this setting screen, which is designed to allow easy access to all programs. It could be made more beautiful, but as it will only be administrators who will have access to it, I don’t really want to put too much effort into the aesthetics.
Real Time Clock
Another difference in this location is that there is no internet access. The Raspberry Pi usually gets its time from the network, but it is possible to add a real time clock (RTC) module, which keeps a battery backup of the time. I bought a RTC module, and followed instructions on the internet to enable it, quite easy.
Network
There is no network in this location, however if I’m doing maintenance I don’t want to have to carry a network cable. I decided to set the Pi up as an access point (AP), and following instructions from the internet this turned out to be quite easy too. The Pi boots up into AP mode, which means if I scan for networks with my laptop I can join its network, and while there is no internet access, I can browse its folders via samba, and connect to the shell using ssh.
The lack of internet connection quickly posed problems, as there is no way to even install new modules. I decided to try setting my wireless temporarily as a client, and using my phone as an access point. Then I could visit the location with a laptop, connect the laptop and the Pi to the phone and they would be on their own private network. I initially hit a problem in that the HTC (or android) only routes data on certain ports, and ssh on port 22 wouldn't work. I quickly found that ssh could be configured on more than one port, so I set it to run on 443 as well, hoping that it would be routed, and this worked fine. The only problem is that the phone seems quite slow as a router, but at least it is an easy internet solution.
Hardware
One of the challenges was to put the whole thing into a nice box. I asked a friend to look for a box for me, and he came back with an IP65 rated box that ended up being a great job. I used the metal part from some old floppy drives to mount the circuit boards on, and it made the inside of the box relatively tidy.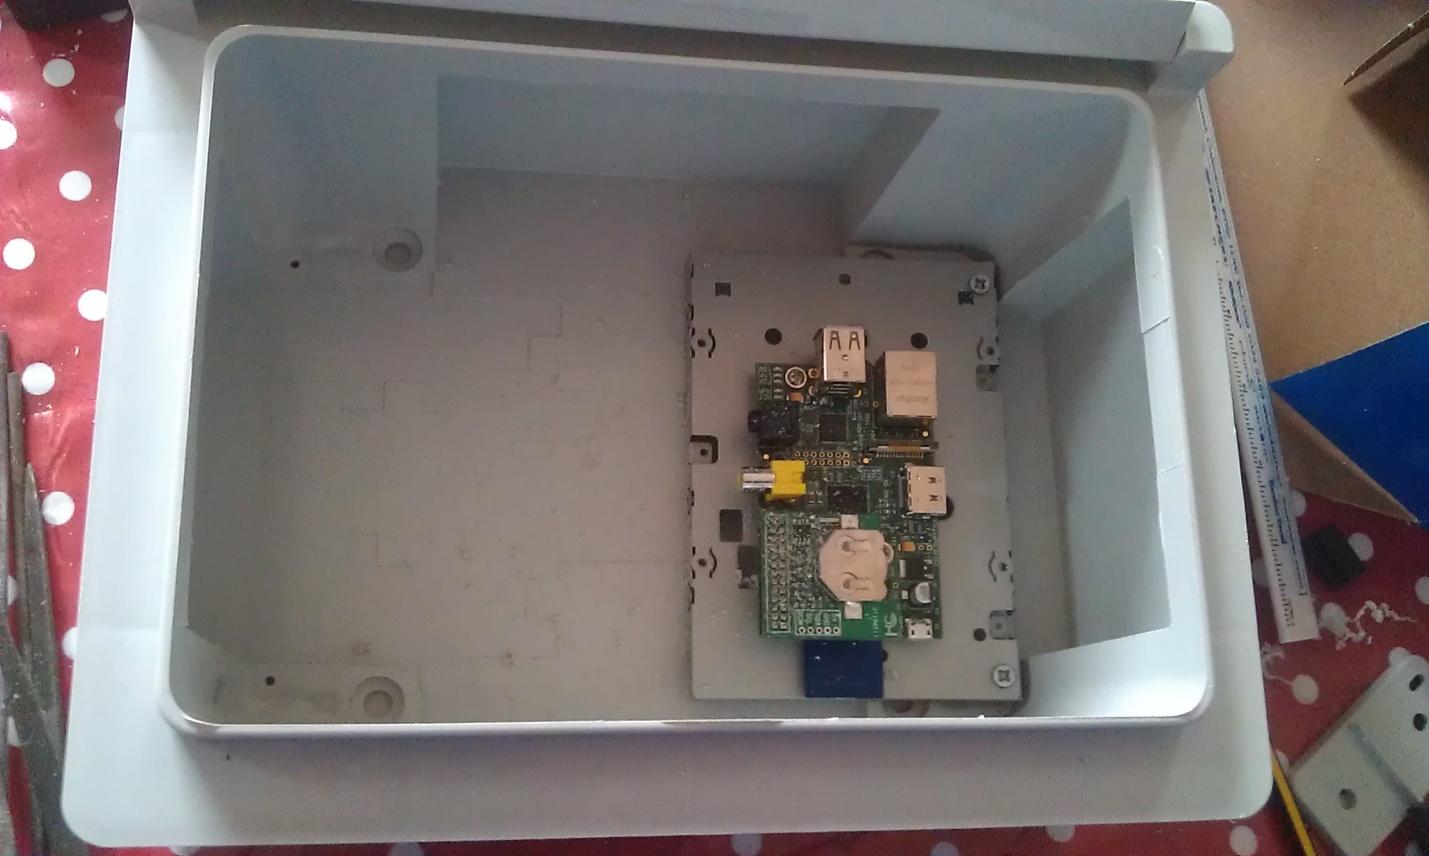
The screen was difficult to mount, as it seemed to be designed to fit inside a bezel. However, I found some old clips, and superglued them into slots in the box to make a mounting for the screen. This worked out quite neat, and I fed the ribbon cable from the screen and touchscreen overlay through slot to the controller boards which I mounted on the inside of the door.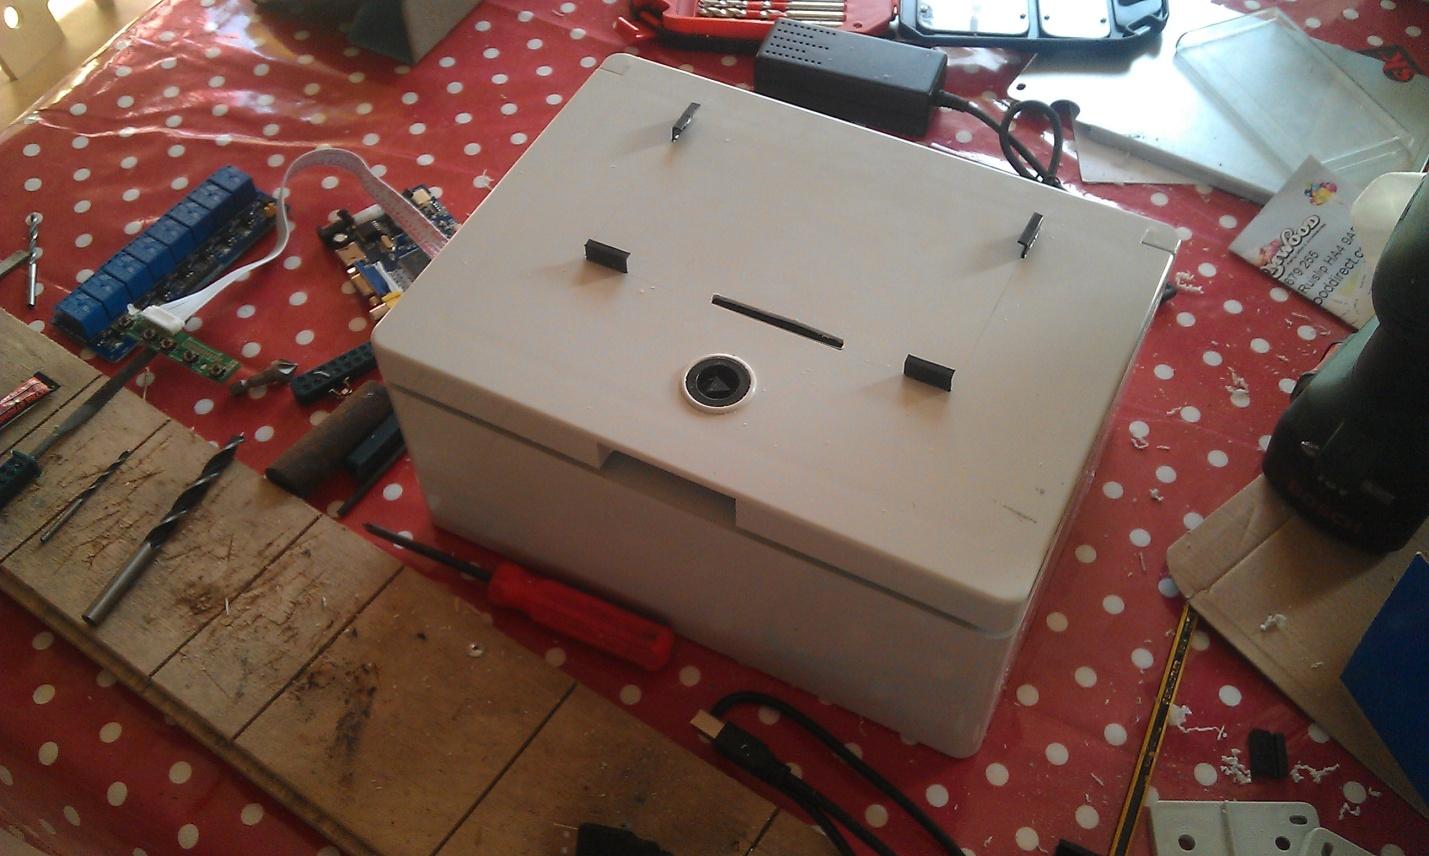
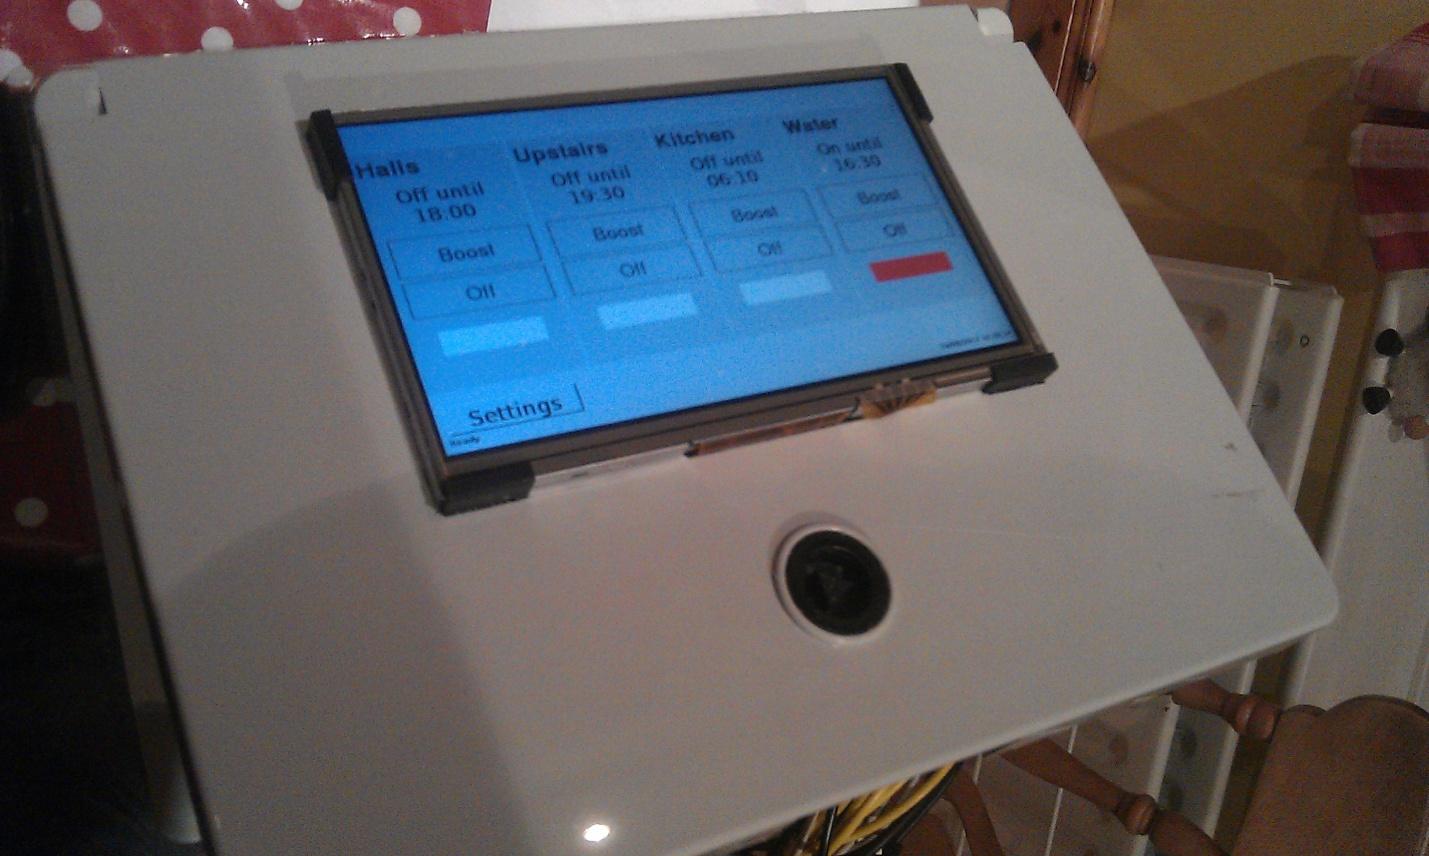
Installed and running an initial revision of the software
Screensaver
By default the Raspberry Pi screen goes blank after 10 minutes, but the problem is that touching the screen to bring it on also activates whatever you touched. If someone touches the boost or off buttons, as well as bringing the screen on it would also perform the action. Installing xscreensaver (run xscreensaver-demo to configure it) solves this because after configuring it to go blank after 10 minutes touching it doesn't activate the buttons below. It is still a sub-optimal solution though as it doesn't switch the screen off, it only makes it go blank.
Mouse pointer
Touching the screen is exactly the same as clicking with a mouse. The problem is that this action moves the mouse pointer, which can often obscure the activated control. I found that a little utility called unclutter could help with this, hiding the mouse a few milliseconds after the click.
Conclusion
The system has been installed and running for about a week now, and initial feedback seems positive. However, the real test will be the longer term, where it will run many programs over many weeks, months and hopefully years. The Raspberry Pi seems like a capable little computer for this sort of task.
Raspberry Pi heating controller
Introduction
About six years ago I created and installed a proprietary system for controlling our central heating. The setup was client-server, where the server was C# software running on a Win32 box, using RS232 to control a VIOM unit, which in turn activated relays to turn the zones on and off. There is no thermostatic control in this software, it is simply time based on/off programs. The system has three zones, downstairs, upstairs and water.
The main aim was to make a piece of software that would allow easy setting of time programs. The controller that was initially installed in the house was a standard three zone controller (Horstmann), but the programs were fiddly to set, limited in number, and with those controllers people typically don’t change the heat programs soon enough when it comes to summer or winter, thus having a warm or cold house and wasting oil.
The system was installed and ran pretty much maintenance free for those years. However, as I wanted to add little features I realized that the architecture was over engineered, and some of the C# was outdated.
With the advent of the £30 raspberry pi, and the fact that I make a living writing Java, I decided to rewrite my software for the pi. I did a little research to make sure that the pi could do all I needed, which is basically a bit of I/O and run 24/7, reliably.
I began by re-writing the C# pretty much line for line in Java. Getting it working first in java was my main priority. It turned out to be easier than I thought, even the RS232 stuff was a lot easier in Java than C#. Once I got it working, I put it on the windows server in place of the C# to ensure that it worked reliably over the longer term. Stage 1 complete, it was time to order my pi.
RPi
The raspberry pi is a pretty cool little computer, I bought the starter kit from maplin, which meant I didn’t need to steal a keyboard, mouse, hub and SD card from elsewhere. I don’t have a HDMI monitor, so I used a TV for development. Once I had SSH up and running I was able to work remotely. I also installed samba which made it really easy to deploy from eclipse to the pi.
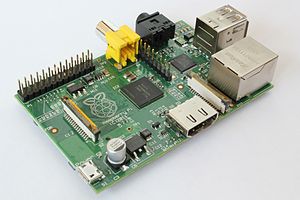
Raspberry Pi Board
Java install - I followed the instructions to install java here (http://www.oracle.com/technetwork/articles/java/raspberrypi-1704896.html) which includes setting up software floating point version of the OS. Follow the instructions there, it will work fine. Make sure and do the update and upgrade commands, as they will get a pile of stuff, and it seemed to help with some of the problems I had.
- up to date packages will minimize problems
- sudo apt-get update
- sudo apt-get upgrade
- ensure you select the option to expand the SD card, as 2GB will stop the java installation part way through, and this can be troublesome (setup can be run again at any time using the command sudo raspi-config)
Wireless configuration
Wireless configuration caused quite a lot of trouble. Initially it seemed to work fine, but then sometimes it dropped and wouldn’t reconnect. I tried different managers, but none really pleased me, so in the end I wrote a simple script that runs frequently, and reestablishes the connection if it is dropped.
cron entry:
* * * * * /etc/network/wireless_check.pl >> /var/log/wireless_check.log
The script:
--
#!/usr/bin/perl
my $status = `/sbin/ifconfig wlan0`;
if($status =~ /inet addr:/)
{
#do nothing
#print localtime . " connection is up\n";
}
else
{
print localtime . " connection is DOWN\n";
print "status: " . $status;
print `/sbin/ifup --force wlan0`;
}
--
The script is written in perl because it’s easy and quick, it very simply checks the ifconfig status for the wireless, and if it contains an ip address it does nothing, otherwise it runs the ifup command. It has been running now for many days, and no problems.
Hardware
I started development on a breadboard to make sure that I had my I/O working. My kids just don't understand the marvel of pressing a key and having an LED come on, or pressing a switch and having some text scroll up the console. It was very easy to get working using the instructions on the web (http://pi4j.com/example/control.html), and the java library provides lots of useful functionality, such as event driven callbacks for I/O changes.
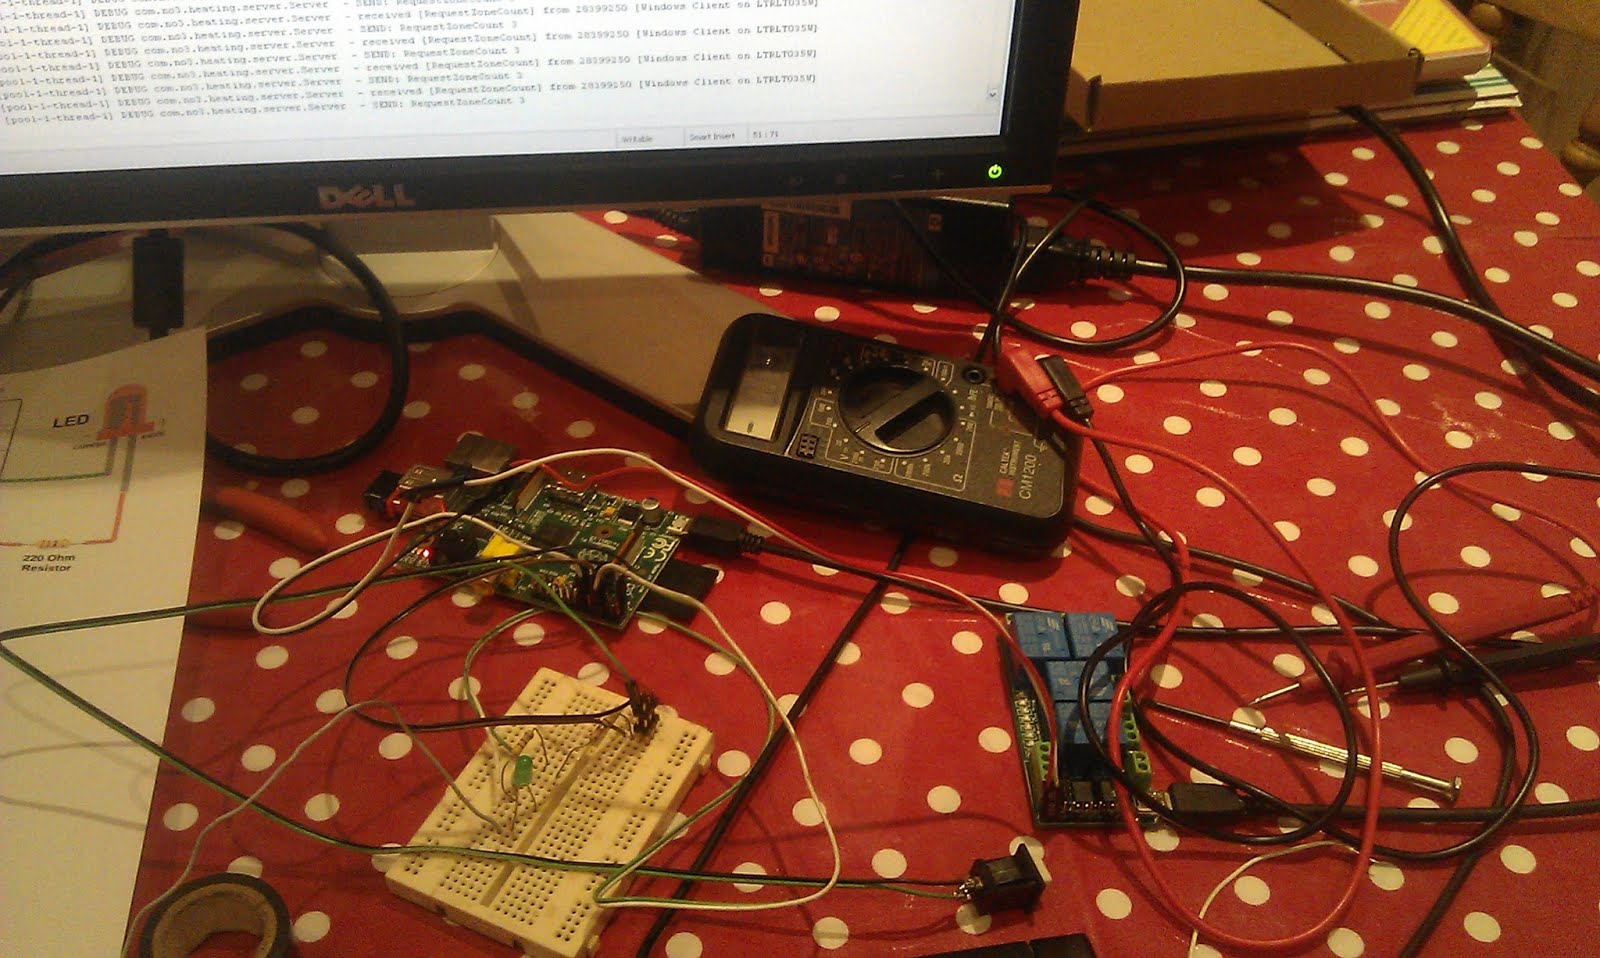
Development with breadboard and relay board
I then swapped the LEDs for a uln2803 8 bit 4 relay Board (from eBay) which made a reassuring clunk when a GPIO line changes state. The 10A relays are also far more than necessary for switching the heating pumps and boiler.
I used a Slice Of Pi board to tidy the whole thing up. It just needed some pull-up resistors and terminals to connect my switches to. I know the pi is supposed to be configurable to not need pull up/down resistors, but I couldn’t get that to work reliably, and for the sake of a couple of resistors, that was an easy solution. I also wrote a little debounce code into my input class, so that multiple events within 100ms are ignored.

Slice of Pi Board

Slice of Pi board fitted and in place
Power
Both the pi and the relay board both require 5v from a USB connector (one mini and one micro). Initially I had hoped to use an old HTC charger as they are pretty tiny, but by the time I had remodelled it, it was no longer working. I used the maplin charger, which conveniently came with screws in the case, so it was easily taken apart. I taped it all up, so that there was only USB out and 240v in (via a connector block) showing out the ends of the package. I then cut cables to size and ran them to each of the boards.
Boxing it up
I had hoped to squeeze the whole thing into one deep double gang wall pattress, but after spending an evening I decided that was not possible. I ended up getting a box from maplin which was a much better solution. The pi is mounted in a cut out piece of antistatic foam, and the relay board pretty much stayed in place with the cable attached to the relays. Each wire goes out through the back of the box in individually drilled holes. The exposed end of the relay circuit board is at the bottom of the box to minimize the risks of anyone touching it, as it will be live all the time.
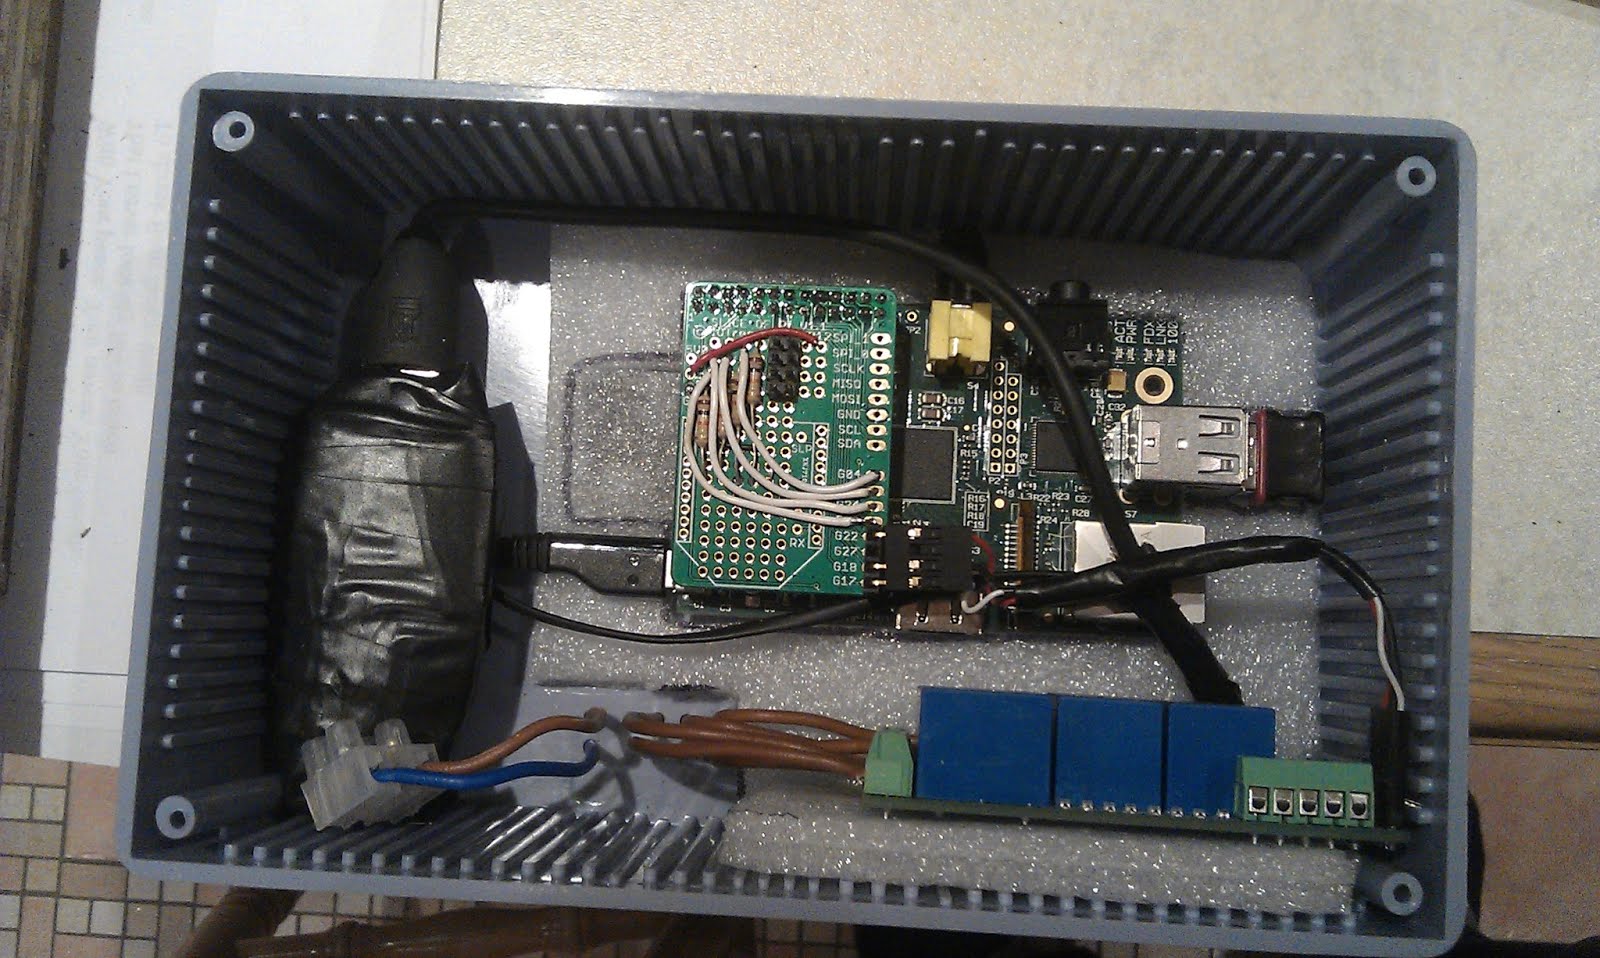
Power supply (left), Relay board (right bottom), and mounted pi
The switches for each zone fitted nicely into the front of the box, but the screw connectors for them are pretty huge for the box, something smaller would be more suitable.
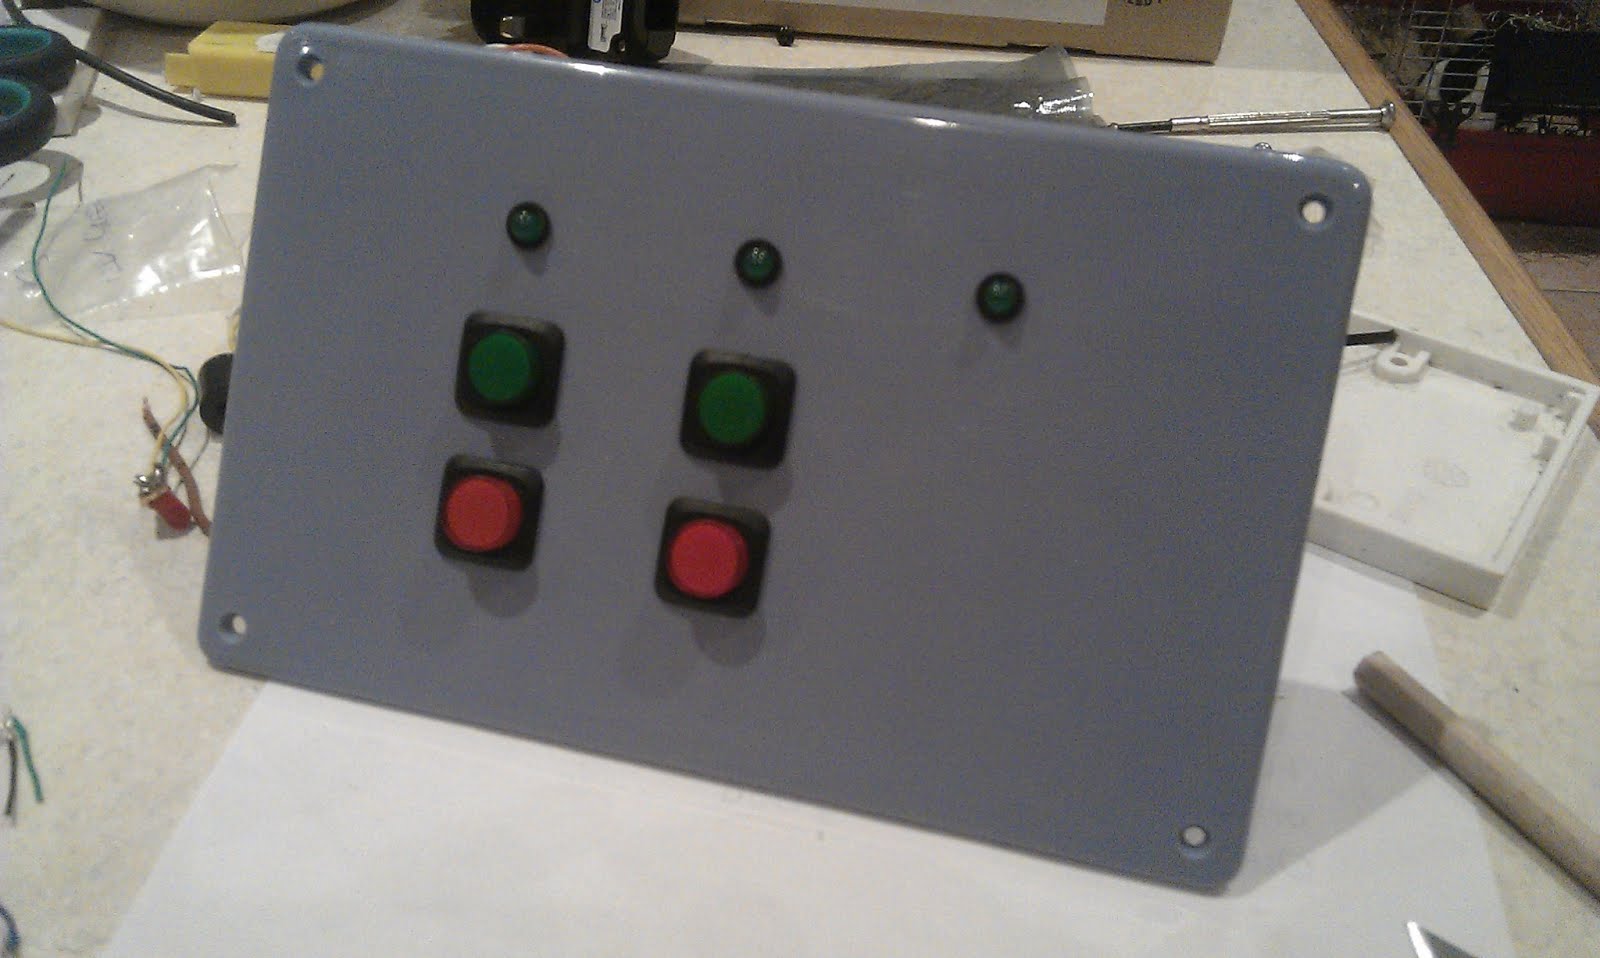
LED’s and Push Switches for basic control

In Situ beside the isolator switch (no boost buttons for the water)
Software - server
The java server software ran first time on the pi. It is supposed to be write once, run anywhere, but seeing is really believing!
Once it was all running I worked in iterations to simplify the java server. There have been quite a few changes, added a couple of features. It’s a lot simpler now than it was, and a lot tidier, although it could still be improved.
In the beginning the server ran in a console window, but that is not acceptable for production.The server software must run reliably all the time, start automatically on boot and restart if it stopped. I spent a while figuring out how to write a service, and got it all working, but I was concerned about its ability to restart if it died. After a lot of experimenting there seems to be a million ways to crack this nut, but in the end I decided to use start-stop-daemon to control my process, and run that with some special args from inittab. The init line ended up looking like this
Heat:2345:respawn:start-stop-daemon --start -p /tmp/heating.pid -m --exec /usr/bin/java -v -d /home/pi/builds -- -jar heating_server.jar
Options explained:
- --start - only one instance will ever exist.
- -p file - specify the file in which to store the pid
- -m - make the pid file if it doesn't already exist
- --exec - specify the actual executable
- -v - prints verbose messages - now unnecessary, but useful getting it up and running
- -d - specifies the directory to run in
- -- - other arguments are passed directly to the java process
This seems to work very reliably. To stop the server simply comment out the line in inittab and run init q (careful not to run init 1 though - just beside ‘q’ on the keyboard!)
The other significant change was to use log4j to simplify the logging. Using the XML configuration it can automatically gzip the files at the end of each month.
class="org.apache.log4j.rolling.TimeBasedRollingPolicy">
The other logging modification was to make the main method take an extra argument to enable logging to the console if it is running directly from the command line for debugging, for example. This is achieved by a simple bit of java in the main class:
if (args != null && args.length > 0
&& args[0].equalsIgnoreCase("console")) {
System.err.println("Enabling console logging");
BasicConfigurator.configure();
Logger.getRootLogger().setLevel(Level.INFO);
Logger.getLogger("com.").setLevel(Level.DEBUG);
}
Software - Clients
There are also quite a few changes to the C# winforms client. It was also a bit over engineered, but now it uses easier TCP code, has less layers, and is more configurable.

Windows Client - main screen

Windows Client - settings for zone (in 5 minute granularity)

Windows Client - Statistics Viewer - Year View
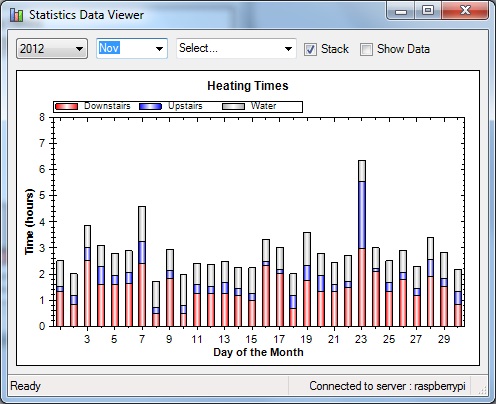

Windows Client - Statistics Viewer - Month and Day Views
The HTTP and SMS interfaces got a work over too, and they now work faster than ever. SMS is handled by an SMS to HTTP gateway (provided for very little cost from bulksms.co.uk). Previously the HTTP requests were handled by a C# CGI program, but now they are handled by a small perl script, which is far quicker and far easier to maintain.

HTTP Client running on iPad
The SMS client uses abbreviated notation to allow quick texting - all commands must start with On or Off and there is a special Status command which just returns the next programs to run. Zone names can be written in full or abbreviated 1=Downstairs, 2=Upstairs, 3=Water.
Examples:
On 1 - Turn downstairs on now for default boost time (10 minutes)
On 2 30 - Turn upstairs on now for 30 minutes
On 1 2200 - Turn downstairs on at 22:00 for default boost time (10 minutes)
On 1 1100 35 - Turn downstairs on at 11:00 for 35 minutes
Each message is replied with a list of the three next programs to run in each zone.

SMS Interface - Example Messages
As I now have an Android phone, and it is easy to write programs in Java for it I decided to give it a go. Communicating with the server and drawing simple widgets on the screen turned out to be pretty easy. It was all the other stuff that took a lot of time, the app lifecycle, screen rotation, and switching in and out of being the active program. However, in a simple form it works pretty well.

Android Controller App
Conclusion
The clients and server have been running reliably now for about a month, and it seems to be fine. There is still extra work to do, but it is only on the periphery, the main work is complete, and operating satisfactorily.
Subscribe to:
Posts (Atom)