Thursday, September 05, 2013

Raspberry Pi heating controller


Introduction


About six years ago I created and installed a proprietary system for controlling our central heating. The setup was client-server, where the server was C# software running on a Win32 box, using RS232 to control a VIOM unit, which in turn activated relays to turn the zones on and off. There is no thermostatic control in this software, it is simply time based on/off programs. The system has three zones, downstairs, upstairs and water.


The main aim was to make a piece of software that would allow easy setting of time programs. The controller that was initially installed in the house was a standard three zone controller (Horstmann), but the programs were fiddly to set, limited in number, and with those controllers people typically don’t change the heat programs soon enough when it comes to summer or winter, thus having a warm or cold house and wasting oil.

The system was installed and ran pretty much maintenance free for those years. However, as I wanted to add little features I realized that the architecture was over engineered, and some of the C# was outdated.

With the advent of the £30 raspberry pi, and the fact that I make a living writing Java, I decided to rewrite my software for the pi. I did a little research to make sure that the pi could do all I needed, which is basically a bit of I/O and run 24/7, reliably.

I began by re-writing the C# pretty much line for line in Java. Getting it working first in java was my main priority. It turned out to be easier than I thought, even the RS232 stuff was a lot easier in Java than C#. Once I got it working, I put it on the windows server in place of the C# to ensure that it worked reliably over the longer term. Stage 1 complete, it was time to order my pi.

RPi


The raspberry pi is a pretty cool little computer, I bought the starter kit from maplin, which meant I didn’t need to steal a keyboard, mouse, hub and SD card from elsewhere. I don’t have a HDMI monitor, so I used a TV for development. Once I had SSH up and running I was able to work remotely. I also installed samba which made it really easy to deploy from eclipse to the pi.
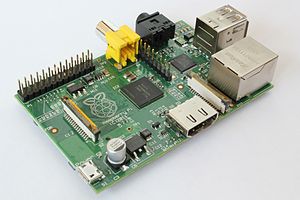
Raspberry Pi Board

Java install - I followed the instructions to install java here (http://www.oracle.com/technetwork/articles/java/raspberrypi-1704896.html) which includes setting up software floating point version of the OS. Follow the instructions there, it will work fine. Make sure and do the update and upgrade commands, as they will get a pile of stuff, and it seemed to help with some of the problems I had.
  • up to date packages will minimize problems
    • sudo apt-get update
    • sudo apt-get upgrade
  • ensure you select the option to expand the SD card, as 2GB will stop the java installation part way through, and this can be troublesome (setup can be run again at any time using the command sudo raspi-config)

Wireless configuration

Wireless configuration caused quite a lot of trouble. Initially it seemed to work fine, but then sometimes it dropped and wouldn’t reconnect. I tried different managers, but none really pleased me, so in the end I wrote a simple script that runs frequently, and reestablishes the connection if it is dropped.

cron entry:
 * *  *   *   *     /etc/network/wireless_check.pl >> /var/log/wireless_check.log

The script:
--
#!/usr/bin/perl

my $status = `/sbin/ifconfig wlan0`;

if($status =~ /inet addr:/)
{
       #do nothing
       #print localtime . " connection is up\n";
}
else
{
       print localtime . " connection is DOWN\n";
       print "status: " . $status;
       print `/sbin/ifup --force wlan0`;
}
--

The script is written in perl because it’s easy and quick, it very simply checks the ifconfig status for the wireless, and if it contains an ip address it does nothing, otherwise it runs the ifup command. It has been running now for many days, and no problems.

Hardware


I started development on a breadboard to make sure that I had my I/O working. My kids just don't understand the marvel of pressing a key and having an LED come on, or pressing a switch and having some text scroll up the console. It was very easy to get working using the instructions on the web (http://pi4j.com/example/control.html), and the java library provides lots of useful functionality, such as event driven callbacks for I/O changes.
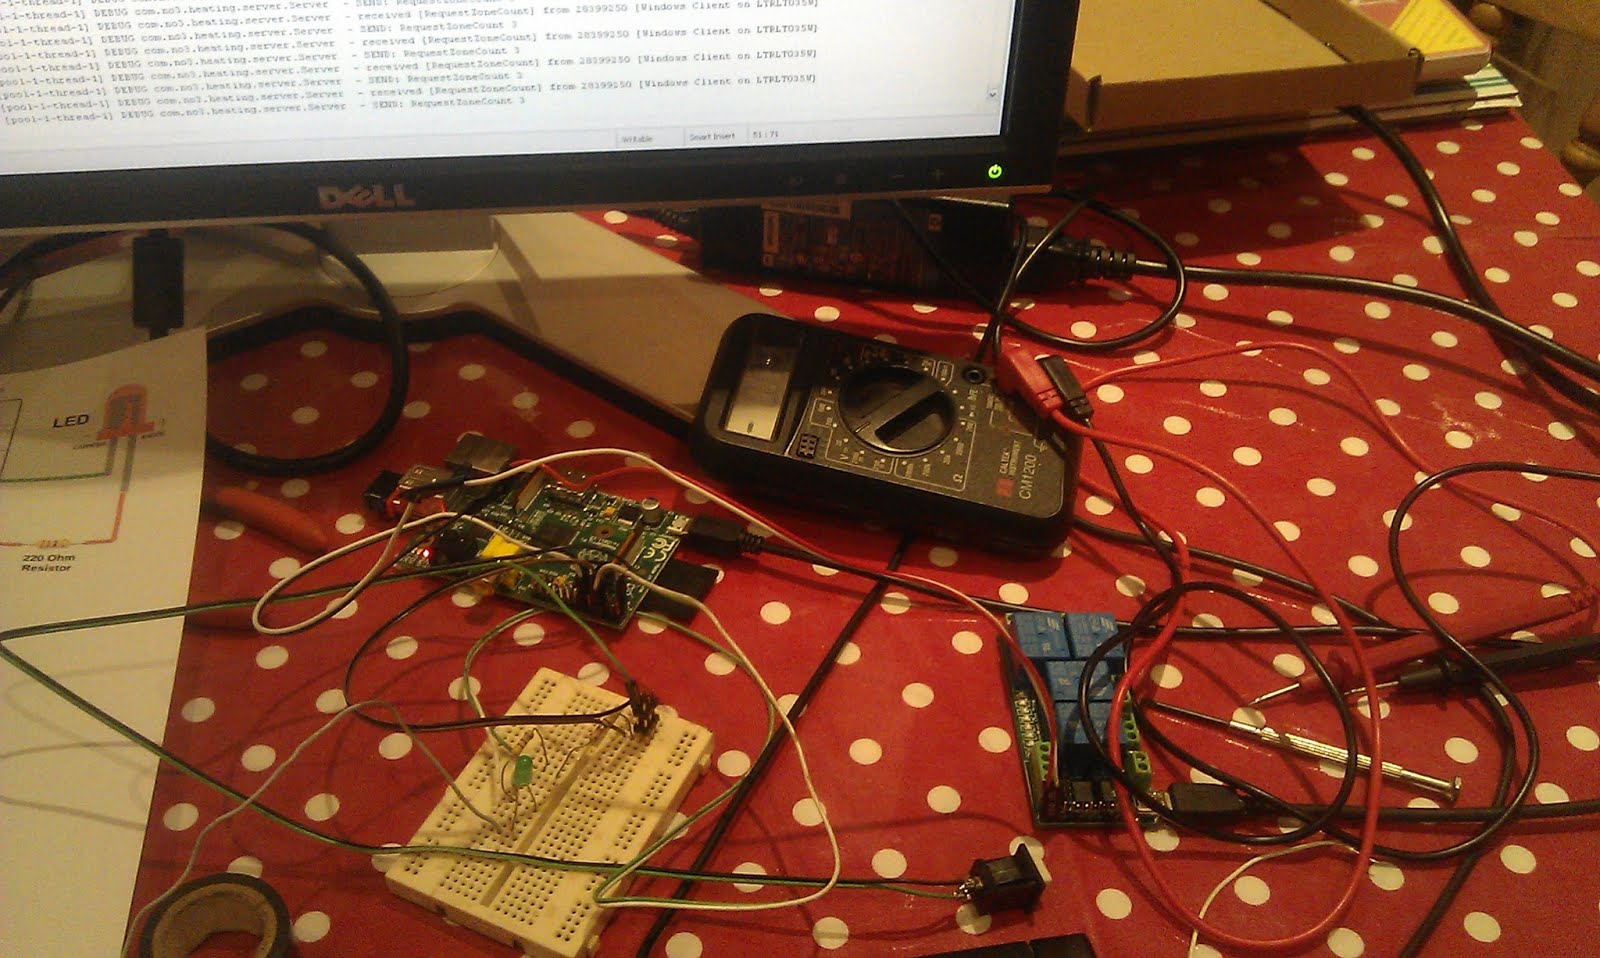
Development with breadboard and relay board

I then swapped the LEDs for a uln2803 8 bit 4 relay Board (from eBay) which made a reassuring clunk when a GPIO line changes state. The 10A relays are also far more than necessary for switching the heating pumps and boiler.

I used a Slice Of Pi board to tidy the whole thing up. It just needed some pull-up resistors and terminals to connect my switches to. I know the pi is supposed to be configurable to not need pull up/down resistors, but I couldn’t get that to work reliably, and for the sake of a couple of resistors, that was an easy solution. I also wrote a little debounce code into my input class, so that multiple events within 100ms are ignored.

Slice of Pi Board


Slice of Pi board fitted and in place

Power

Both the pi and the relay board both require 5v from a USB connector (one mini and one micro). Initially I had hoped to use an old HTC charger as they are pretty tiny, but by the time I had remodelled it, it was no longer working. I used the maplin charger, which conveniently came with screws in the case, so it was easily taken apart. I taped it all up, so that there was only USB out and 240v in (via a connector block) showing out the ends of the package. I then cut cables to size and ran them to each of the boards.

Boxing it up

I had hoped to squeeze the whole thing into one deep double gang wall pattress, but after spending an evening I decided that was not possible. I ended up getting a box from maplin which was a much better solution. The pi is mounted in a cut out piece of antistatic foam, and the relay board pretty much stayed in place with the cable attached to the relays. Each wire goes out through the back of the box in individually drilled holes. The exposed end of the relay circuit board is at the bottom of the box to minimize the risks of anyone touching it, as it will be live all the time.
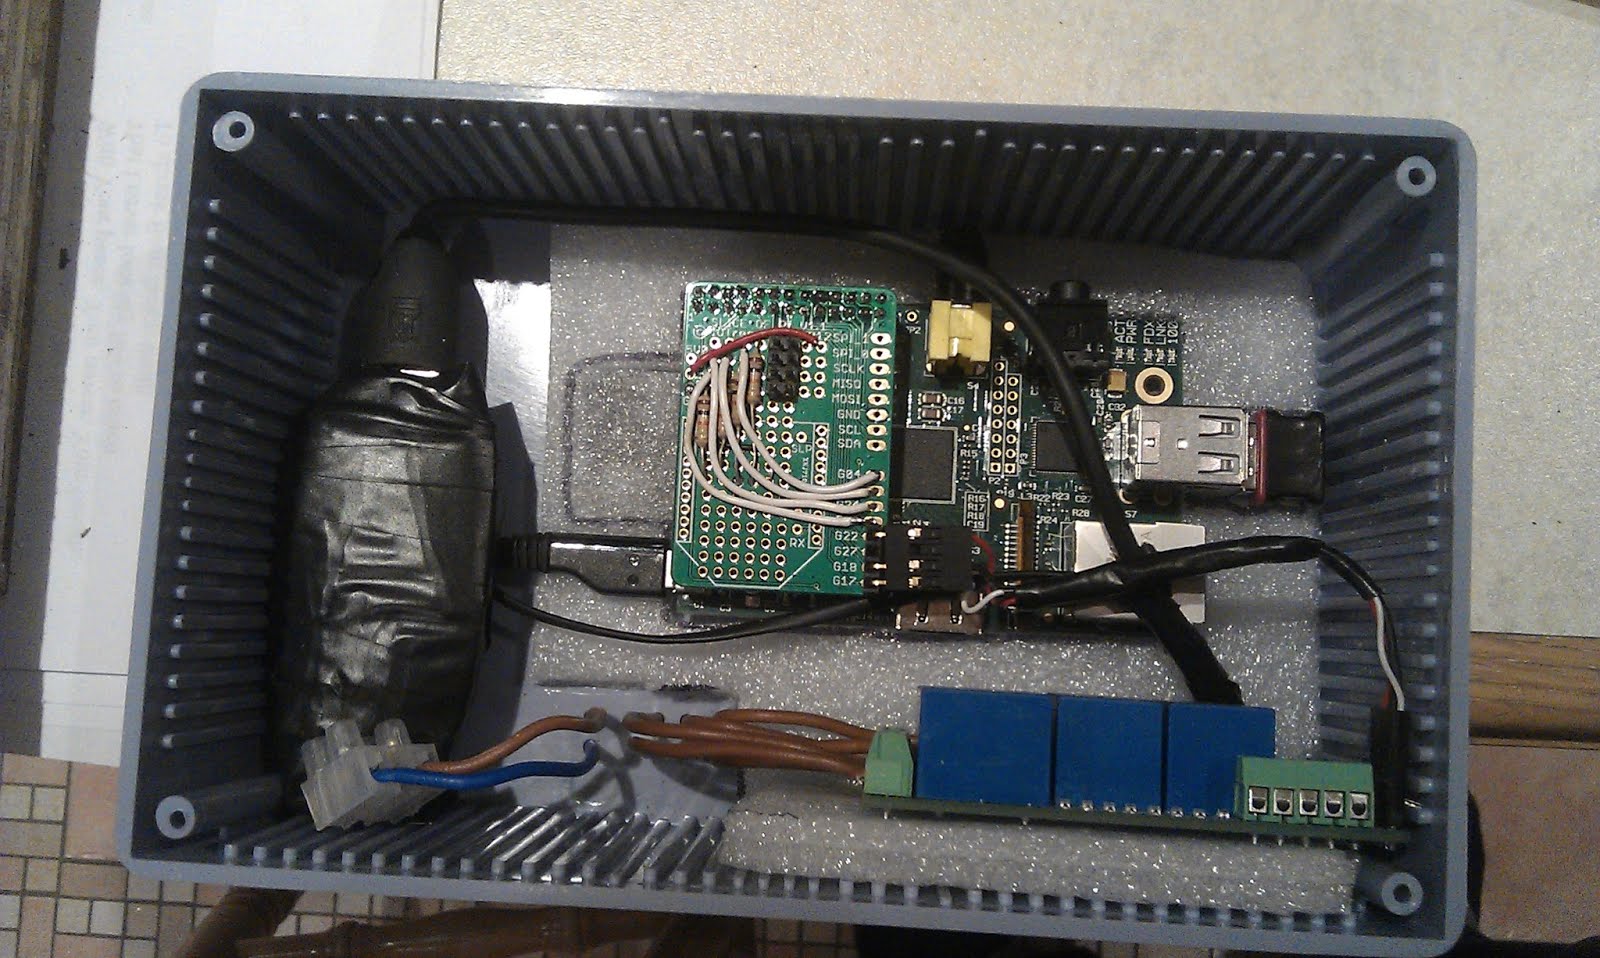
Power supply (left), Relay board (right bottom), and mounted pi

The switches for each zone fitted nicely into the front of the box, but the screw connectors for them are pretty huge for the box, something smaller would be more suitable.
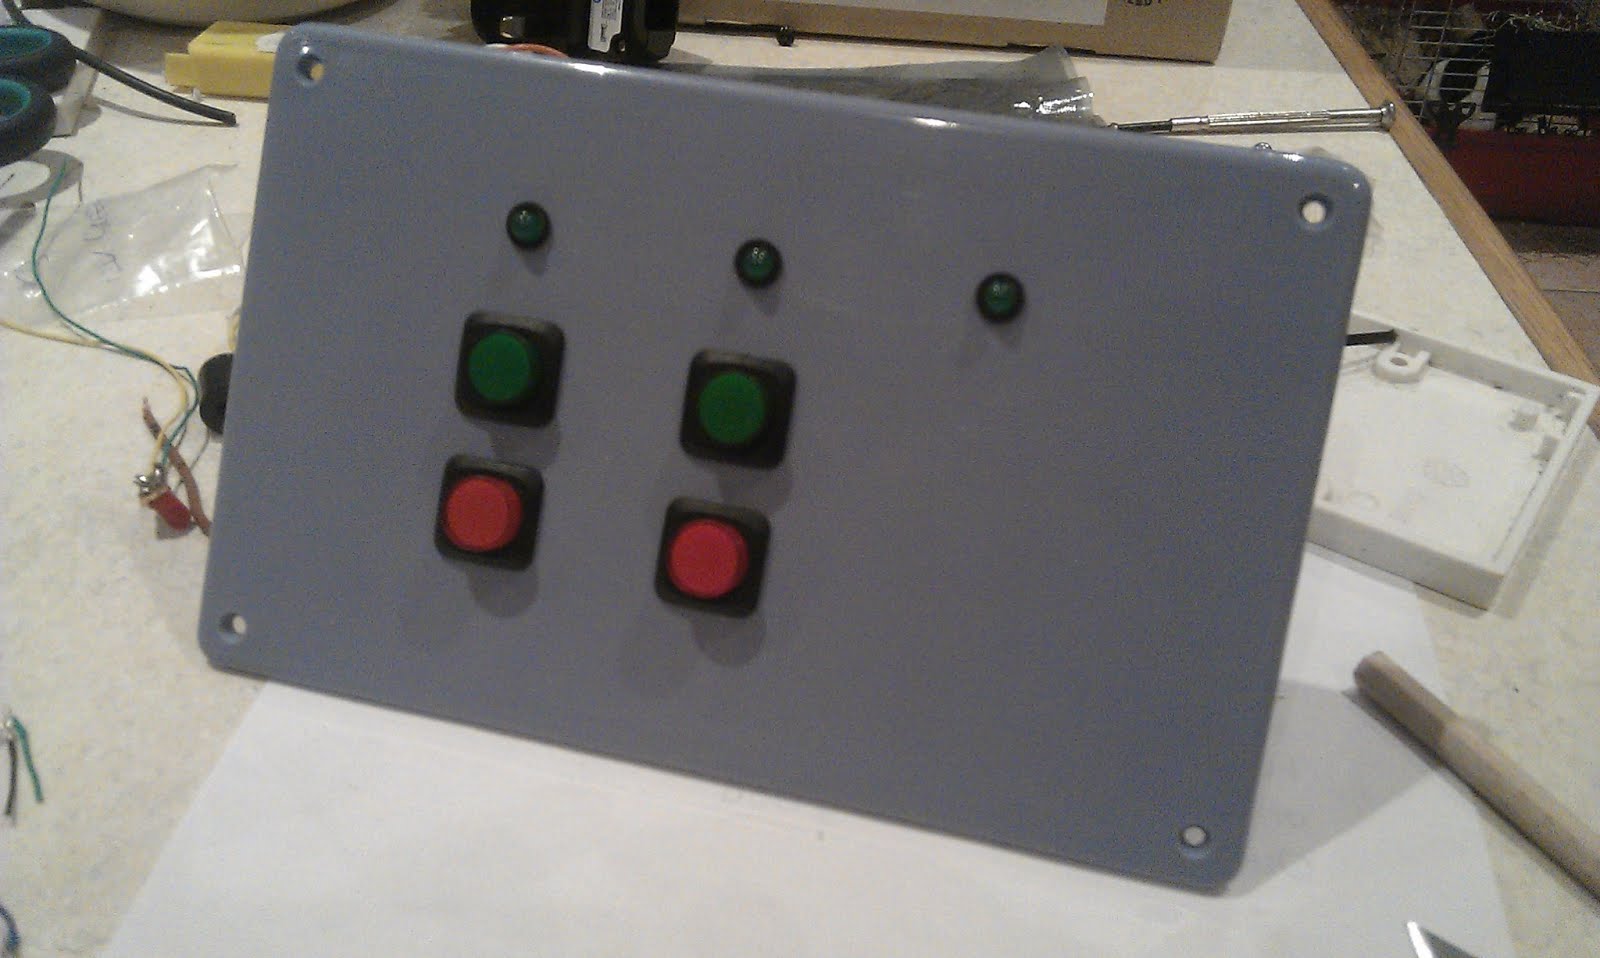
LED’s and Push Switches for basic control


In Situ beside the isolator switch (no boost buttons for the water)

Software - server


The java server software ran first time on the pi. It is supposed to be write once, run anywhere, but seeing is really believing!

Once it was all running I worked in iterations to simplify the java server. There have been quite a few changes, added a couple of features. It’s a lot simpler now than it was, and a lot tidier, although it could still be improved.

In the beginning the server ran in a console window, but that is not acceptable for production.The server software must run reliably all the time, start automatically on boot and restart if it stopped. I spent a while figuring out how to write a service, and got it all working, but I was concerned about its ability to restart if it died. After a lot of experimenting there seems to be a million ways to crack this nut, but in the end I decided to use start-stop-daemon to control my process, and run that with some special args from inittab. The init line ended up looking like this

Heat:2345:respawn:start-stop-daemon --start -p /tmp/heating.pid -m --exec /usr/bin/java -v -d /home/pi/builds -- -jar heating_server.jar

Options explained:
  • --start - only one instance will ever exist.
  • -p file - specify the file in which to store the pid
  • -m - make the pid file if it doesn't already exist
  • --exec - specify the actual executable
  • -v - prints verbose messages - now unnecessary, but useful getting it up and running
  • -d - specifies the directory to run in
  • -- - other arguments are passed directly to the java process

This seems to work very reliably. To stop the server simply comment out the line in inittab and run init q (careful not to run init 1 though - just beside ‘q’ on the keyboard!)

The other significant change was to use log4j to simplify the logging. Using the XML configuration it can automatically gzip the files at the end of each month.


class="org.apache.log4j.rolling.TimeBasedRollingPolicy">


The other logging modification was to make the main method take an extra argument to enable logging to the console if it is running directly from the command line for debugging, for example. This is achieved by a simple bit of java in the main class:
if (args != null && args.length > 0
&& args[0].equalsIgnoreCase("console")) {
System.err.println("Enabling console logging");
BasicConfigurator.configure();
Logger.getRootLogger().setLevel(Level.INFO);
Logger.getLogger("com.").setLevel(Level.DEBUG);
}


Software - Clients


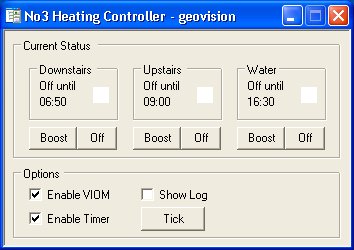
There are also quite a few changes to the C# winforms client. It was also a bit over engineered, but now it uses easier TCP code, has less layers, and is more configurable.


Windows Client - main screen


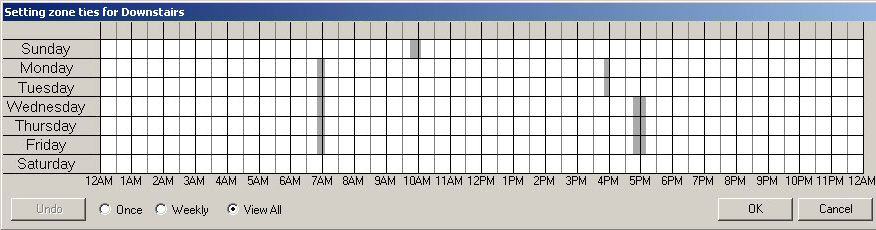
Windows Client - settings for zone (in 5 minute granularity)


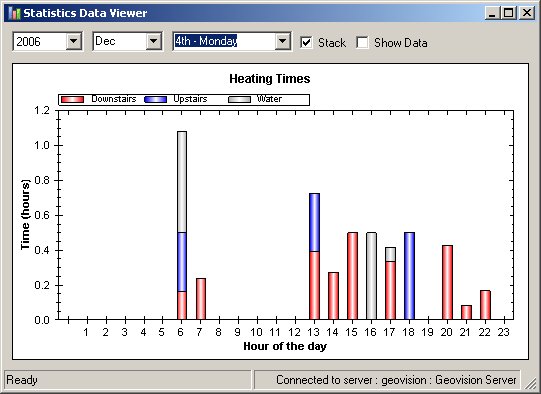
Windows Client - Statistics Viewer - Year View
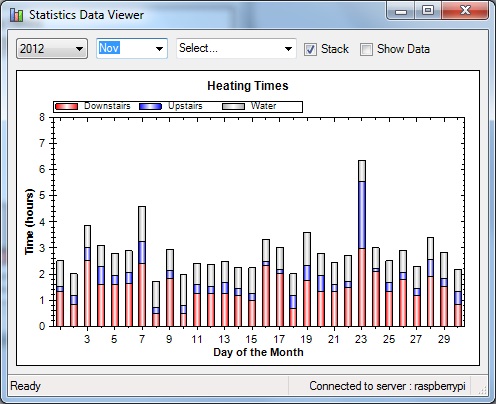


Windows Client - Statistics Viewer - Month and Day Views


The HTTP and SMS interfaces got a work over too, and they now work faster than ever. SMS is handled by an SMS to HTTP gateway (provided for very little cost from bulksms.co.uk). Previously the HTTP requests were handled by a C# CGI program, but now they are handled by a small perl script, which is far quicker and far easier to maintain.


HTTP Client running on iPad


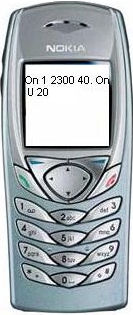
The SMS client uses abbreviated notation to allow quick texting - all commands must start with On or Off and there is a special Status command which just returns the next programs to run. Zone names can be written in full or abbreviated 1=Downstairs, 2=Upstairs, 3=Water.
Examples:
On 1 - Turn downstairs on now for default boost time (10 minutes)
On 2 30 - Turn upstairs on now for 30 minutes
On 1 2200 - Turn downstairs on at 22:00 for default boost time (10 minutes)
On 1 1100 35 - Turn downstairs on at 11:00 for 35 minutes


Each message is replied with a list of the three next programs to run in each zone.


SMS Interface  -  Example Messages


As I now have an Android phone, and it is easy to write programs in Java for it I decided to give it a go. Communicating with the server and drawing simple widgets on the screen turned out to be pretty easy. It was all the other stuff that took a lot of time, the app lifecycle, screen rotation, and switching in and out of being the active program. However, in a simple form it works pretty well.


Android Controller App


Conclusion
The clients and server have been running reliably now for about a month, and it seems to be fine. There is still extra work to do, but it is only on the periphery, the main work is complete, and operating satisfactorily.

Automated Heating Control


Automated Heating Control

Introduction

In 2004 we moved into our new home, which was built on a green field site, and largely designed by ourselves. As such I had included miles of cable and conduit to ensure as much future-proofing as possible.

One of my intentions had been to provide some form of automated central heating control, but at the time I couldn't get a design clear in my head. So I just went ahead and got the plumber to put in the standard system, with three zones, one for downstairs, one for upstairs, and a third for the hot water. I also left a spare STP CAT5 cable near the standard heating timer.

For me the main initial objectives of the system would be twofold:
  1. Higher degree of control over the system - the installed system only allowed 3 on/off programs per day, 10 minute resolution, and the boost function operated for an hour or two hours which was far too long.
  2. I wanted remote control. I like my heat, and I hate coming home late at night to a freezing house. I want the house to be warm when I get there. 

Having done a lot of reading and research I decided to roll my own control solution, and I decided that a VIOM unit from Phaedrus Ltd was a good controller to use. This unit connects to the COM port of a PC and enables relays to be switched on and off using text commands.

In January of 2005 I managed to pick one up for a reasonable price from a member of the ukha_d mailing list. I quickly fired up my Visual Studio and managed to get the relays flicking on and off. Step 1 complete.

And there the work stopped. Other things took over my time, and so it went on the to-do list. In October of 2005 I decided to have another go, but quickly got bogged down in code relating to times/dates/repeats, how to represent programs in a versatile manner, and how the GUI program setting would look and work. After a while I lost heart, other projects took over, and it was again consigned to the shelf.

This October I started again. This time I decided on a design and worked from the ground up, and then from the inside out.

Initial design

My design strategy is always simple. KISS - keep it simple stupid. I came up with a brief list of requirements:
  1. System must control 3 relays - one for each zone
  2. System must have hardware inputs (Push buttons)
  3. Must have visual hardware outputs (LEDs)
  4. System software must be componentised so that components are independent allowing their implementation to be changed if required
  5. The system should provide a number of remote control methods
  1. Windows based client - this would be the main client
  2. Web client - control should be possible across the internet
  3. SMS client - would be nice - text message the heating to be on when you get home
  4. Instant messenger client

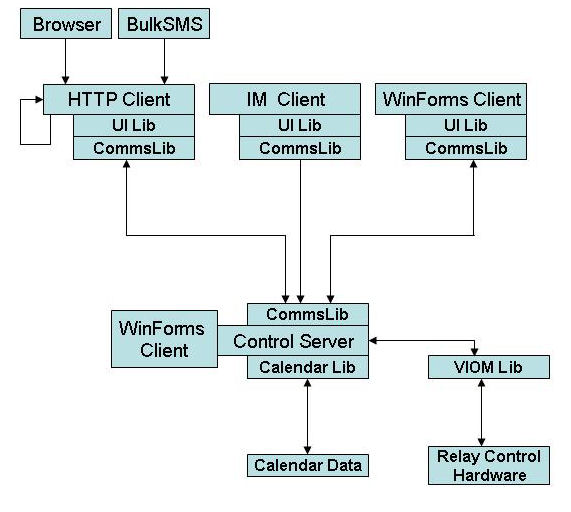
My initial drawing of the system design actually turned out to be fairly true to the final implementation. Each block represents a component of the system, with several common sub-components reused in the main components.


   Initial System Design

This design clearly depicted the separation of components I desired, and contained a minimum number of components I thought I would need for a complete system.

I started building test projects, firstly a nice wrapper around the VIOM code, then trying to get the comms working. I wanted a nice simple text protocol, and after some difficulties with synchronous method calls I decided to go for a completely asynchronous architecture.

Once I was happy with these building blocks I started to code up the proper Control Server. This really took the form of a Windows Forms application, which had a couple of buttons to start with. I checked that I could simply turn relays on and off from GUI button presses. Then it was time to start the calendar component, which would be used to store the program information for the system. I decided to have a separate instance for each zone. For simplicity I created a text configuration file, comma separated containing the information for a weeks on/off events.


Each event contains the following fields :
  
Field
Content
Day
The day of the week this program is applied to
On Time
Time of the day this program starts at
Program length
The length in minutes of the program
Program type
Once or Weekly
Once for once only programs, like if downstairs should be on for 30 minutes starting at 6pm tonight. Once programs get deleted when they have run
Program state
On or Off
Normally programs are On, but if the heating is set for a Weekly On program, and it is overridden to turn it off, an "Off" "Once" program is inserted to override the current "On" program. Once programs always override Weekly programs


The calendar component is responsible for determining the state of the system, other components can simply ask it if the heating for that zone is on or off.

Having completed the initial implementation of the Calendar I moved to looking at the UI Library. I wanted to wrap comms messages suitably so that any of the clients could re-use the same UI Lib to talk transparently to the server. The UI Lib component was coded up providing methods like On(string zoneName, int timeInMinutes) and Off(string zoneName).

Each client could then be coded up to be purely presentation code, leaving any logic to the libraries, or server.

I tidied up my server application and gave a couple of debugging options, so that I could safely debug or add new features without the boiler going on and off constantly.


WinForms Client

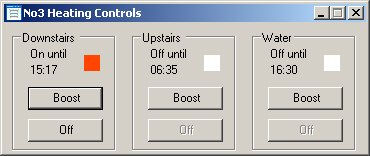
The first, and main client is a windows forms application. This is now deployed on each PC in the house, allowing control and visibility of the heating state from each machine. It is written to live in the system tray, with the main window only appearing when double-clicked.


It displays the current state of the three zones, and shows the next upcoming timed event.

Setting the times is performed graphically by right clicking on any of the three zones, and choosing the menu item to configure the zone. This displays the time setting dialog.


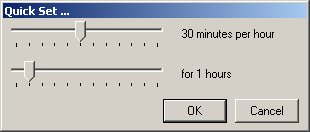
From this it is possible to set timed programs - either "Once" where they get deleted after being run, or "Weekly" programs that are saved to run every week. The granularity of the tool allows programs to be set in multiples of 5 minutes. Right clicking on the grid offers the option of "Quick Set" for the zone, where the user can quickly add 'once' programs to the system.
 

Programs are inserted beginning at the current time, and can be set for up to 6 hours. The hourly 'on' time can be selected, from 5 minutes to a full hour, and programs are added in a predefined pattern. For example if the user selects 30 minutes per hour for the next hour, the system will toggle on for 10 minutes, off for 10 minutes, three times. This could be easily reconfigured so that it was on for 15 minutes, off for 15 minutes, twice, but I prefer the 10 on / 10 off model. These patterns can be set in the XML configuration file.

Web Client

The web client is an extremely small piece of C# code that is simply written as a Console application using a small CGI library to parse incoming name-value pairs for control input. It runs under Apache's cgi-bin directory, and access is controlled by a .htaccess file. This ensures that any user is fully authenticated before even viewing the system state.


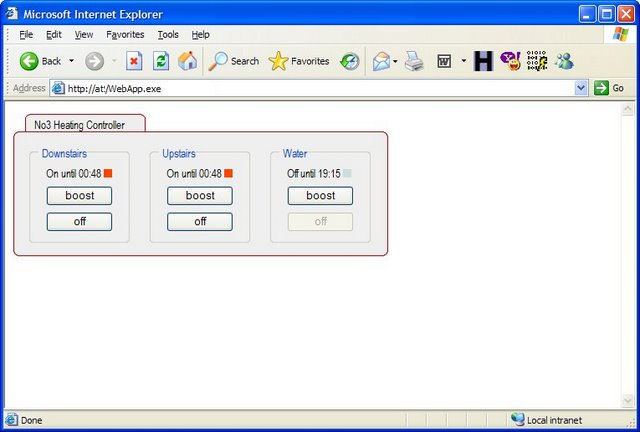
It is designed to look and operate exactly like the Windows client for consistency, although it doesn't offer the complex program setting routines.

SMS Client

In my previous job we had made great use of the services of www.bulksms.co.uk for sending text notifications of events from our monitoring system. This was implemented via a HTTP request to one of their servers, and worked very reliably, and relatively cheaply. I had always noticed in their documentation that there was a reply option, but we had never used it. So I started to investigate, and very quickly had a little web application running that could reply to text messages. From here it was just a matter of deciding on a command format, and implementing a parser for that. For consistency this is implemented in the UI Library.

I wanted to be able to text short commands to control the system, and receive a reply to indicate the outcome of the request. Some example commands are shown in the screenshot below, although many more are available.  

Again security and authentication is an issue on this platform. We don't want some random texter to be turning our heating on or off! It actually turned out to be trivial, as for the free bulksms reply service to work the reply must be exactly that - a reply. So for a phone to control our heating it needs to reply to a text sent from this specific bulksms account, and the user must locate that text and reply to it. This is not as big a headache as it may sound, as each text command sends a status reply, so there is usually a text from the server close to the top of the inbox. It is possible to reply to any text from the server

Yahoo Instant Messenger Client

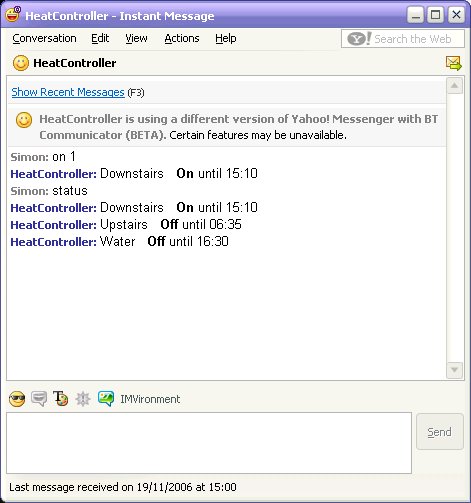
I like Bots, especially interactive ones. So I decided that Instant Messenger would be another potential interface for the heating system control, plus I would have an extra contact on my short list of friends ;) . I couldn't find any Yahoo library for C# or .Net so I called upon the services of the open source java project jYMSG which is a java API interface to the Yahoo messaging system. The API does loads of stuff, but all I really want is send message to user, and receive message.

Rather than attempting to use J# or some other similar glue to access the API, I just wrote a small 'main' class around the API, which blocked on the console waiting for input, and prints any received messages to the console. The program takes input in the form "username:message text" and will attempt to send the message to the specified username. Incoming messages are prefixed too for easy parsing.

Starting a console application and redirecting its input and output is relatively easy in C#. It fits nicely into my message driven architecture. When I want to send a message I call a SendYahoo(username, text) method, and when an incoming message is received an event gets fired.

The next step was to glue that to the UIlib, and with that completed in another small windows application which runs on the server and minimises to the tray, I can now send/receive yahoo messages.
 

The client uses the same UI library as the text messaging client, so the same simple message format works in both places.

Statistics 

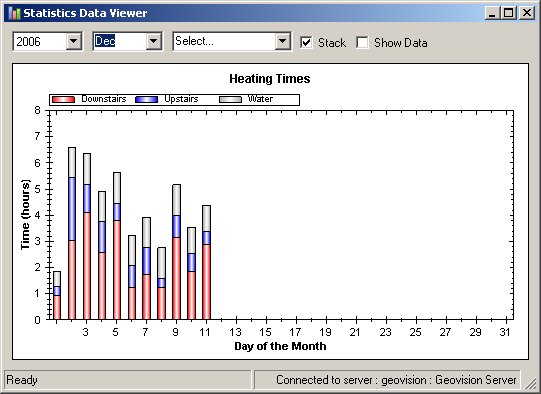
An aspect of this system which I hadn't really thought out beforehand was the ability to compile statistics of our heating usage. In my second production release I added functionality to write on/off events to a log file, which could then be analysed to generate statistics on our oil usage patterns. This I suppose has no real purpose, other than that it would be interesting to see how much the usage varies over the year. It may also be possible to figure out how long the next 900 litre fill will last. I created a simple GUI to display statistics, allowing a drill-down type approach to be used. The first graph presents the statistics for the year, then month, and finally per day.


The current implementation is not really intended to be very useful, more a proof of concept upon which I can build when there is more data to analyse

Hardware

The system hardware is relatively simple. The outputs of the VIOM are connected through another set of power relays that switch the mains voltage zone pumps. The inputs are all momentary push switches.

To avoid interference with the VIOM power supply a second 12v PSU is used to drive the mains relays. This 12v signal is carried using CAT5 cable to the coils of the relays. The relays are located in a white panel box, which replaces the old heating controller in our utility room. There are LEDs across the coil of each relay to visually indicate the status of each zone.

Rather than the system being entirely computer controlled I have included switches on the relay box. A press on the upper switch for a zone will boost that zone, that is turn the zone on for the default boost time. Subsequent presses will extend that time. Pressing the lower switch for a zone will cancel any current program.

The switches are connected directly to the VIOM inputs, allowing multiple switches to be added in parallel. This means that a separate switching controller can be added to the system, and for us that means a bedside switch from which we can put the heat on/off upstairs or downstairs, which has proved very useful! 

Conclusion

Reviewing my initial objectives I am pleased with the solution. The system allows precise control of the heating, with as many programs as desired. I can use it from work, home, phone or any internet connection.

One surprise has been that we actually have only a small number of preset programs, mainly in the morning. It is so easy to turn the heat on for 10 minutes when required in the evenings that this is what we do, rather than having it on from 5-6 pm and 8-9pm every day like the old system was set to. This was really another objective completed - trying to minimise wasted heating, so we weren't running the heating when we weren't there. We have certainly managed this.

You may have noticed that thermostatic control has not been mentioned in this article. We have two thermostats, one for upstairs and one for downstairs. They are useless. As I see it they contribute very little to the system. I have been able to control the system using timing much more effectively. For example last night we had guests, and I didn't want to be running out to the controls through the evening. Before they arrived I set up the heating to be on for 12 minutes each half hour for about 3 hours. This worked brilliantly, when the room started to get a little cold, the heat boosted on again.

Although there is still a lot of work to do on the software, there are as many whistles and bells as I can imagine, I am pleased with the current implementation. I will hopefully get to implementing some more user friendly features shortly, but it certainly is a complete and usable system as it is.

Future Plans

Apart from a few GUI tweeks, and fixing any issues that crop up, I really am very happy with the system as it is. The only thing I think would benefit in the short term would be weather based program control, this is currently implemented but not fully enabled. I have managed to scrape the windchill temperatures from a weather source and store that data. I have also modified the Calendar component to take an extra input to determine if the heating should be turned on a few minutes early, but I just haven't linked the two subsystems together yet.

If I was starting again, with the house build, I would ensure I had hardware to control each room as a zone, as I believe this would greatly increase the efficiency of the system. However, the thought of writing the control code for it would be a bit scary....


Tuesday, September 03, 2013

ubuntu / debian - installing packages offline (Raspberry Pi)

I now have a Raspberry Pi deployed in a commercial situation in a building with no internet connection. This means I have to take software there on removable media. I have a second Pi at home with the same software on it, so I can figure out dependencies.

First run a command on my local, internet connected Pi to get the links to the .deb packages for the package I want - in my case xscreensaver.

sudo apt-get --print-uris --yes install xscreensaver | grep ^\' | cut -d\' -f2 >downloads.list


Now on my local machine I need to download them
wget --input-file downloads.list


At this stage I have all the packages required to install my xscreensaver package in the current directory. I then put them onto a memory stick (or whatever) and transfer them onto the Pi with no network. Once on the Pi the files must be moved into the correct directory so apt-get can see them, and will not try to download them
sudo mv *.deb /var/cache/apt/archives/


All that remains is to install the packages (it will look like its going to download stuff, just answer 'Y' and it will install
sudo apt-get install xscreensaver


And voila - the package and all its dependencies are installed! Simple.


Reference : http://www.tuxradar.com/answers/517

Wednesday, August 28, 2013

Raspberry Pi (RPi) kernel build for eGalax touchscreen support

Recently I bought a 7" eGalax touchscreen from eBay, and got it working by downloading a kernel from this site. However, I wanted to have a go at compiling this kernel from newer source by myself.

I found a lot of information out there on cross compiling the kernel for the raspberry pi, but I couldn't find a single set of idiot-proof instructions that I could get to work. This article is for my own reference, and includes text from lots of other places (links at bottom).

To run this I downloaded Ubuntu 12.10 which I burnt to a CD. This creates a bootable live Ubuntu  or gives the option to install. So I got an old hard disk, and put it into one of my PC's, booted up from the CD and installed Ubuntu on the disk.

First, install the package dependencies, git and the cross-compilation toolchain:

sudo apt-get install git-core gcc-4.6-arm-linux-gnueabi

sudo ln -s /usr/bin/arm-linux-gnueabi-gcc-4.6 /usr/bin/arm-linux-gnueabi-gcc

Next you need to get the source code for the pi kernel, and some tools. There are two ways to get this, either via git, which I couldn't seem to use because of my slow internet connection, or otherwise by downloading an archive

mkdir raspberrypi
cd raspberrypi

by git:
git clone https://github.com/raspberrypi/tools.git
git clone https://github.com/raspberrypi/linux.git
cd linux

by archive download

wget https://github.com/raspberrypi/linux/archive/rpi-3.10.y.tar.gz
wget https://github.com/raspberrypi/tools/archive/master.tar.gz

then extract the archives (tar -zxvf filename) and rename the linux-* source directory so it is called linux, and the master-tools to be called tools.


Next you need to generate a .config file. (cd into the linux dir)
make ARCH=arm CROSS_COMPILE=/usr/bin/arm-linux-gnueabi- bcmrpi_defconfig
(you can substitute bcmrpi_cutdown_defconfig for bcmrpi_defconfig to create a smaller kernel, if you care.)


To make changes to the configuration, I had to run make menuconfig
make ARCH=arm CROSS_COMPILE=/usr/bin/arm-linux-gnueabi- menuconfig

(I had to install the curses lib to get the menu working sudo apt-get install libncurses5-dev)
From this I had to select Device Drivers->Input Device Support->TouchScreens. Select (press space bar) so that Touchscreens has a * beside it, and once you've done that press enter for a further submenu. In this menu you need to select USB touchscreen Driver which contains the driver for the eGalax touchscreen as one of its sub-components. NOTE: there may be other eGalax entries in the list above this that you do not have to select (don't select eGalax multitouch).

Once these selections are made just keep pressing ESC-ESC to get out (or select exit from the bottom) and when you get to the yes/no prompt, select yes to save the config.

Now we are ready to start the build. You can speed up the compilation process by enabling parallel make with the -j flag. The recommended use is ‘processor cores + 1', e.g. 3 if you have a dual core processor:
make ARCH=arm CROSS_COMPILE=/usr/bin/arm-linux-gnueabi- -k -j3

This takes about 20 minutes on my PC (dell 755)

Assuming the compilation was sucessful, create a directory for the modules:

mkdir ../modules

Then compile and ‘install’ the loadable modules to the temp directory:

make modules_install ARCH=arm CROSS_COMPILE=/usr/bin/arm-linux-gnueabi- INSTALL_MOD_PATH=../modules/

Now we need to use imagetool-uncompressed.py from the tools repo to get the kernel ready for the Pi.

cd ../tools/mkimage/
./imagetool-uncompressed.py ../../linux/arch/arm/boot/Image

This creates a kernel.img in the current directory. Plug in the SD card of the existing Debian image that you wish to install the new kernel on. Delete the existing kernel.img and replace it with the new one, substituting “boot-partition-uuid” with the identifier of the partion as it is mounted in Ubuntu.

sudo rm /media/boot-partition-uuid/kernel.img
sudo mv kernel.img /media/boot-partition-uuid/

Next, remove the existing /lib/modules and lib/firmware directories, substituting “rootfs-partition-uuid” with the identifier of the root filesystem partion mounted in Ubuntu.

sudo rm -rf /media/rootfs-partition-uuid/lib/modules/
sudo rm -rf /media/rootfs-partition-uuid/lib/firmware/

Go to the destination directory of the previous make modules_install, and copy the new modules and firmware in their place:

cd ../../modules/
sudo cp -a lib/modules/ /media/rootfs-partition-uuid/lib/
sudo cp -a lib/firmware/ /media/rootfs-partition-uuid/lib/
sync

That’s it! Eject the SD card, and boot the new kernel on the Raspberry Pi!


Referenced articles:
http://elinux.org/RPi_Kernel_Compilation
http://mitchtech.net/raspberry-pi-kernel-compile/
http://www.engineering-diy.blogspot.ro/2013/01/adding-7inch-display-with-touchscreen.html

Tuesday, July 16, 2013

Marriage - 5 P's


Proclamation - Marriage proclaims God's perfect design. Jesus is the groom and his bride is the church. Marriage is designed to be a display of this relationship as we interact and compliment each other in our different roles and responsibilities.

Procreation - Making babies. God's design, he made all the bits fit, and told us to multiply.

Partnership - In the Garden of Eden, before sin entered the world, God said “It is not good for the man to be alone. I will make a helper suitable for him.” A man needs a woman as a 'helper' and a woman is complimented by a man.

Pleasure - Marriage is for fun too, it should be your best friendship, and of course the physical pleasure that is reserved for married people.

Purity - Marriage is the place where the fire of passion in your heart gets an outlet. Fire is good as long as it is kept in the fireplace, and the fireplace of marriage is the correct place for the sexual relationship.

Monday, July 01, 2013

How do I hope to get to Heaven?


Yesterday our minister gave us a challenge to spend 5-10 minutes writing out briefly how each of us think we will get to Heaven. Below is my attempt. Comments welcome.

What is the Problem? - we all have sinned (any time we ever broke any of the commandments) and this creates a huge gap between us and God that we cannot get across. God is Holy, and just and cannot tolerate any sin. All sin must be punished, because God is good.

What is the Solution? - 2000 years ago Jesus came to Earth and was fully God and fully man, lived a perfect life on Earth, facing all the same difficulties (temptations) as us, but never falling into sin. He died on the cross as all of God's wrath was poured out on him and he took the punishment for our sin (those who accept Him as Lord). Without this we would have to pay ourselves, and the only mechanism for payment is eternity (forever, with no way out) in hell (a place of eternal torment, where after 10,000 years of your flesh being burned you would be no closer to the end than when you first began). And on the third day Jesus rose from the dead, and walked the earth before ascending into Heaven, where today he intercedes for us.

What do I have to do? 3 answers:
1) Nothing. The work of salvation is complete - there is nothing I can do to add to that. Anything I do to contribute to my salvation will actually take away from it. Good works are like filthy rags. There is nothing I can do to earn favour with God, it's impossible. Nothing I do can make God love me more (and nothing I do can make him love me less)
2) Nothing. There is nothing I can do, unless I am called by the Spirit to salvation. Within me there is not even the power to choose salvation, unless I am prompted by God.
3) Trust and Obey (like the old hymn says) - In practical terms think of salvation as a free gift (which it is). Any gift is useless unless it is accepted. Believing (not just intellectual assent, but trusting) is how I accept the gift. This is the process of realising Jesus is Lord of my life (we cannot 'make him Lord of our life' as he is already Lord of all, we can merely come to accept the truth.) After this Jesus calls us to 'follow' him - to give up everything, to die to our sin, to ourselves, to die to our wants and desires. We must surrender everything to him, anything less is utterly unacceptable. All of this can only be done through his power, self-help or self-improvement is impossible for us, it's futile. Through him, and the spirit living within us, transforming us, we are in the process of sanctification, or being made holy, and this process continues as long as we live.

What do I get? Eternal live - which starts now, as I live in relationship with God. It is made perfect after death and continues in heaven for evermore. Now we get sonship - we are co-heirs with Christ, sons of God, with the full rights of bloodline sons (& daughters). We get to call God father.  We get direct access to the creator of the whole universe who is sovereign, and rules over each intricate detail of what happens every day. What more could we want?

Wednesday, June 12, 2013

St Peters, Rome

Today after work (in FCO, Rome) I took the bus from the airport to the Termini station, and got the metro to near the Vatican. Rome is an unfamiliar environment to me, I suppose like any big city. While travelling you can see ruins, elaborate hotels and other buildings, nice homes, and tin shacks. The full spectrum of life is on view. From the train it is possible to see a few homes built from waste materials right at the edge of the track. Walking through the streets of the city it is clear that there are a number of homeless people around.

Along with the blazing heat, all of these things are alien to me. I walked down the busy street alongside the Vatican area and arrived in St Peter's Square. It is an impressive place, and an epic experience to be surrounded by thousands of years of heritage like this, huge pillars, massive statues and monuments.

As I walk around the huge open area, whatever way I turn there are works of architectural art. Of course the pinnacle in this area is the Basilica and what's better is that it is completely free to enter. I found the way in and walked slowly around. The excess is everywhere, from the ornate marble floor to the heavy decorative iron gates, to the sculpted engravings on the doors, to the detailed artwork on the ceilings. The statues, paintings and carvings are everywhere, each more elaborate than the next. New wonders meet the eye at each new glance.

I have visited before, a few years ago, however, on this visit my heart was heavy. Today I had the same eyes, but a different heart. For this to be the headquarters of a church claiming the name of Christ doesn't sit very well with me at all. Let me be clear, I don't see a call to live in poverty for the sake of others, but I do see a directive not to live in excess. I think of Matthew 6:19 "Do not store up for yourselves treasures on earth" as I stand inside this huge treasure trove, the like of which is almost unequaled in the entire world. This doesn't add up to me. I think of the cost of building and maintaining a place like this, and at the same time those people living in cardboard beside the railway are in my head.

It is an amazing spectacle to see, don't get me wrong, if you're nearby pop in and see it. But it seems to smell a little of injustice when you contrast this extravagance with the local and global poverty that exists. There is no need for any church to have accumulated such wealth. I am aware that there is a lot of charitable work done, and so on, but I struggle to believe that what I see around me is the most efficient or effective way to help people. As I exited the building I had a tear in my eye for the errors of our forefathers and the stewardship of the church.

If you get the chance, go, visit, and enjoy the craftsmanship and the amazing artistic and architectural achievements. But do so knowing that a lot of the money that built it came from people who could ill afford it, who paid it to acquire their salvation, and those who were entrusted with it poured it into excessive property rather than pouring it into people who need it.


Tuesday, June 04, 2013

CFC Belfast

It was a series of coincidences that led us to CFC Belfast this past Sunday. I kitesurf with a fellow who goes there, and this I only found out on Saturday when we were talking about our plans. We had tickets to see Belfast Gospel Community Choir, which apparently has strong links with CFC and we had booked to stay the night at the Park Avenue Hotel in Belfast - just across the road.

We knew it would be something modern, but we had no idea at all what to expect. At the door we were greeted by two smiley people, and I was expecting to be recognised as new and mollycoddled a bit, but after they handed us some paper, they left us to our own devices. I asked where to go, and they pointed, and it became quickly obvious where the seated area was.

We picked two of the nice soft seats, and were quite surprised that at the start time only about half of the seats were filled. During the first 10 minutes or so, during the opening songs they quickly filled up.

There are three big screens at the front, and at the start a typographic type video was played, explaining man's fallen state, and what God did to bridge the gap, fixing the problem we could never fix. Gospel presentation within the first 90 seconds! The opening worship started, and it turned out Robin Mark was the worship leader. I thought it was good, Susan was a bit disappointed that she knew none of the songs.

The main service continued with a short communion. Obviously this was *very* different to how Presbyterians generally do it, but I suppose it is refreshing to have a change. There were a couple of things I didn't like though. I felt there wasn't the time I was used to in which to reflect on what is happening. If you were sitting in the centre block, like us, they brought us forward in rows, and there was no easy way to get out of taking communion, which I think is important for those who may not want to. Also, in our communion service, we normally have the passage containing 1 Cor 11:29, about being careful who takes communion, but nothing like that was mentioned, and I felt this was a dangerous omission.

The bread was a loaf of bread, which we got to tear a little off, and the wine was juice served in tiny plastic glasses, which were then deposited into a bin.

The whole thing was a bit rushed for my liking, but that's just my preference.

The speaker was excellent. It was about what commitment to Christ actually means, and dealt with all those difficult verses about 'cannot be my disciple' and hating father and mother. Very captivating delivery, and very scriptural message, backed up with a lot of scripture read and on screen. Before the service this is the part I was most dubious about; I wondered would the teaching be sound, and would I have to go away like a Berean, examining and searching for what I had heard. There was no need. It was all clearly backed up, and made sense right from the outset.

We didn't stay for tea/coffee afterwards which is a pity, but unfortunately circumstances didn't allow.

Overall it was a very positive and good experience, I was nervous about going in, and in the end I had absolutely no need to be. CFC seems to be a vibrant, strong, focused church, seeking and doing the will of the Lord, and long may that continue.

Thursday, May 16, 2013

Saturday 11th May - Kitesurfing - Benone

What a great day today. The conditions were good, although variable throughout the day, sunshine with the occasional shower, some flat times, some huge waves, and about 5-7 kites on the water at any one time.

The wind was nicely cross shore, and enabled us to do a couple of nice downwinders. However on one, I had either not pumped my 9m hard enough, or sand was letting air out of the valve, and I had to abandon half way.

Still, a brilliant day, and even better people were there with cameras :)


Friday, May 03, 2013

Friday 3rd May - Kitesurfing - Benone

It has been ages since everything has lined up for me to get out on the water. Tonight the forecast was marginal, but it seemed to be blowing nicely at home.

I went to Benone shortly after tea, and the sand was blowing nicely along the beach. Once on the water it was clear the the wind wasn't too strong, on the 12 I couldn't stay upwind, but that was OK. It was fine for about two walks, then it was really quite calm, so I packed up and drove down to the river, where it was blowing nicely again.

I suspected it was a bit on the light side so I decided to go for a downwinder by myself. I parked up the beach, set up, and then drove off downwind a few hundred yards. I walked back to my kit, and launched, and went into the water. I like this method, it worked well. Once I was back to the car I packed up, and repeated, this time a little further. The only problem is having to pump up the kite each time - not so big an issue with a real downwinder as you get to go a lot further.

There were some nice kickers, nice flats. I didn't do much apart from cruise around, enjoying the waves, and  doing a few jumps. It was nice to get out, and as it turned out the weather was super too, having rained all day.